Understanding Gas Valves & Regulation in Your Plant
Gas Valves & Regulation systems are critical components in laboratory, industrial, and pneumatic applications across Singapore's manufacturing and processing sectors. Over 35 years, 3G Electric has supported plant managers in diagnosing and resolving gas valve failures that impact production uptime and worker safety.
Unlike simple on/off failures, regulation problems are often insidious—they develop gradually, causing pressure drift, inconsistent output, and unexpected system shutdowns. This troubleshooting guide focuses on identifying root causes rather than symptoms, enabling your maintenance team to address underlying issues before they escalate.
Section 1: Identifying Root Causes of Pressure Drift and Regulation Failure
Common Symptom: Inconsistent Outlet Pressure
When operators report fluctuating pressure readings despite a stable supply line, the issue typically originates from one of five root causes:
1. Diaphragm Degradation
The diaphragm is the primary moving component in most pressure regulators. Over time, elastomer materials degrade due to thermal cycling, humidity exposure, and chemical attack from trace gas impurities. In Singapore's tropical climate with high humidity, this degradation accelerates.
Diagnostic test: Measure outlet pressure under no-flow (static) and full-flow (dynamic) conditions. If pressure drops significantly under load—more than 10% variance—diaphragm failure is likely.
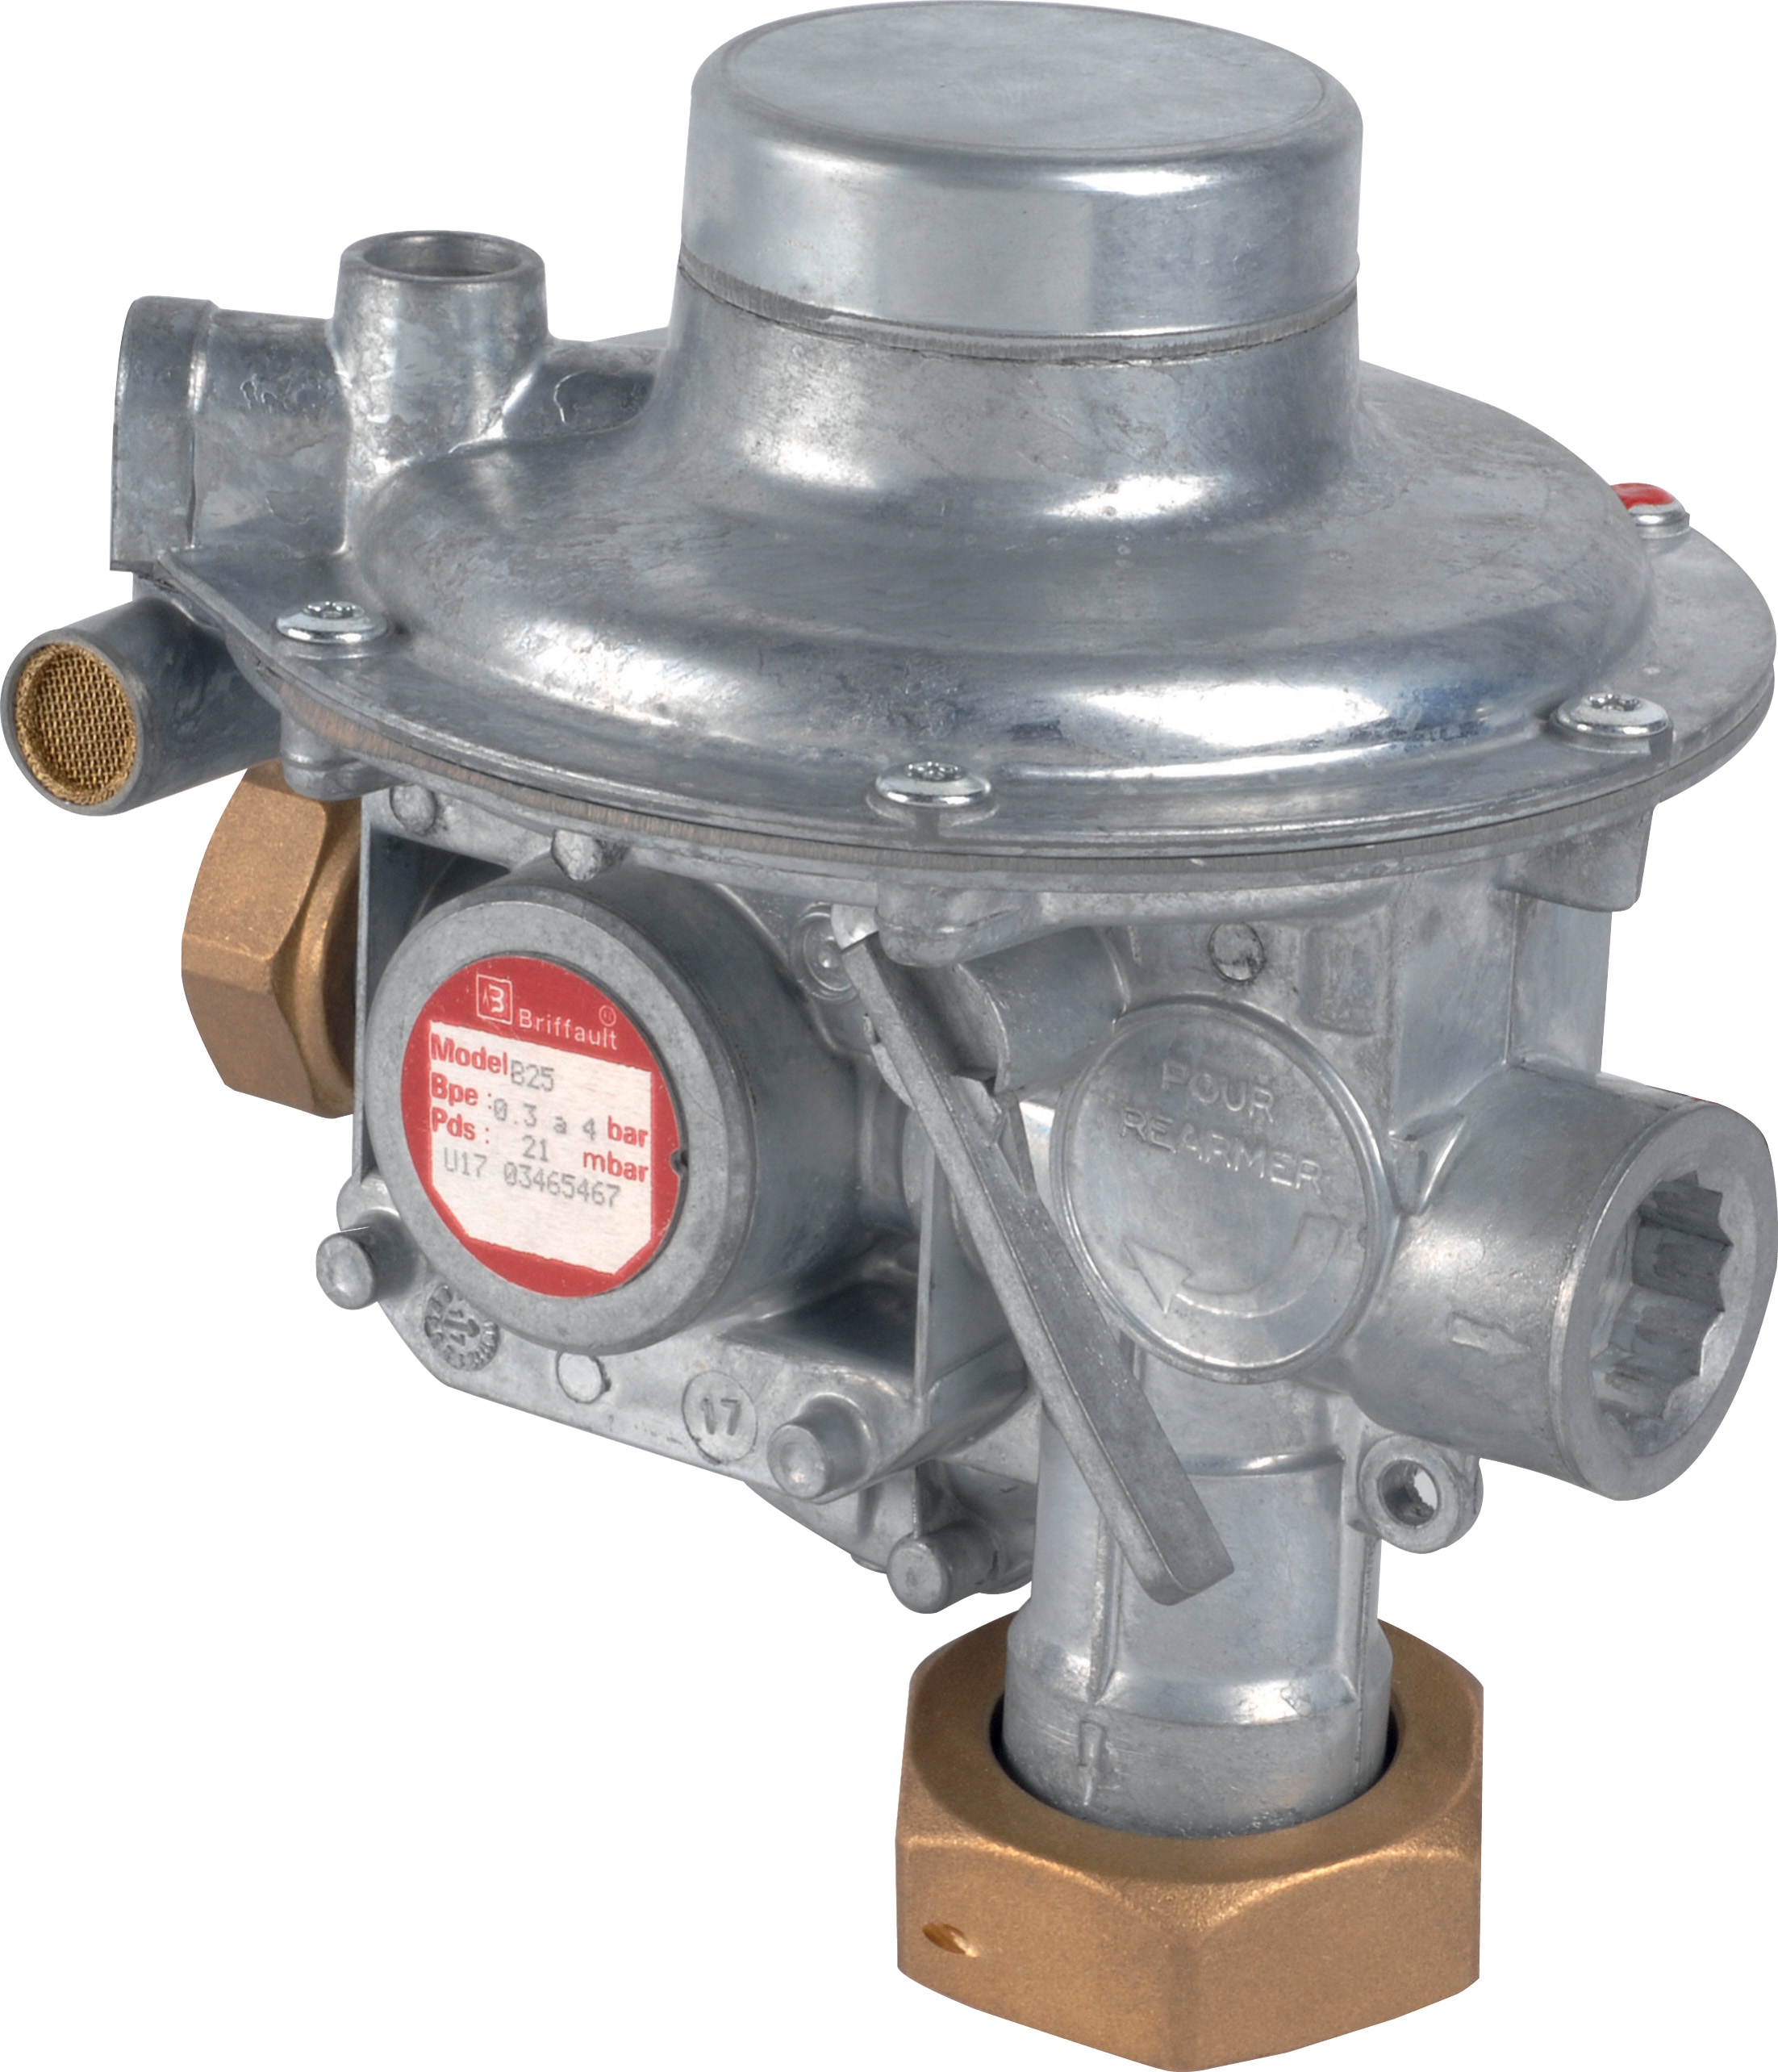
Corrective action: Replace the diaphragm assembly. The Francel B25/37mb pressure regulator features a replaceable diaphragm cartridge, allowing technicians to restore functionality without replacing the entire unit. Inspect the internal cavity for contamination or corrosion during replacement.
2. Spring Fatigue and Loss of Preload
The internal spring maintains the pressure setpoint. If the spring loses preload—caused by corrosion, thermal cycling, or manufacturing defect—the regulator cannot maintain outlet pressure even with an intact diaphragm.
Diagnostic test: Increase inlet pressure by 0.5 bar while monitoring outlet pressure. If outlet pressure rises proportionally (creep), spring preload loss is confirmed.
Corrective action: Spring replacement is often more cost-effective than diaphragm replacement. Document the original pressure setting before disassembly, then adjust after spring replacement using a calibrated pressure gauge. Test across the full range of operating conditions.
3. Vent Port Blockage
The vent (exhaust) port allows the regulator to exhaust excess gas when inlet pressure exceeds the setpoint. Blockage of this port prevents proper relief action, causing outlet pressure to climb beyond the setpoint.
Diagnostic test: Listen for a quiet hissing sound at the vent port during operation. If absent, suspect blockage. Inspect the vent opening visually or use a thin probe to test patency.
Corrective action: Clear blockages by flushing the vent cavity with clean, dry compressed air. Do NOT use liquid solvents, which may damage internal seals. If the vent is a fixed orifice design (like the 10 mm vent in the Francel B25/37mb), replace the regulator if the vent cannot be cleared.
4. Seat Leakage (Internal Bypass)
The seat and sealing surface control flow through the regulator body. Wear, contamination, or particle embedding causes internal leakage, allowing gas to bypass the regulator control mechanism.
Diagnostic test: Isolate the regulator outlet by closing a downstream valve. Monitor outlet pressure over 5 minutes. A steady pressure drop indicates seat leakage. Compare the rate of pressure decay: gradual decay (< 1 bar/hour) is minor; rapid decay (> 5 bar/hour) indicates major leakage.
Corrective action: Clean or polish the seat surface using a soft brass brush and light lapping compound. For contamination-induced leakage, install an upstream filter with a mesh size appropriate to your gas (typically 10 µm for industrial gases). If leakage persists after cleaning, the seat cartridge requires replacement.
5. Pilot Drain Line Restrictions
Many regulators use a pilot-operated design where a small amount of outlet gas bleeds back to the diaphragm chamber via a drain line. Blockage of this line prevents pressure equilibrium and causes regulation failure.
Diagnostic test: Feel for gas flow at the vent port while applying inlet pressure. If vent flow is absent or extremely weak, suspect pilot drain blockage.
Corrective action: Locate the drain line (often a small tube inside the regulator body) and flush it with dry compressed air in the reverse direction. If the blockage cannot be dislodged, the internal passages require professional ultrasonic cleaning or regulator replacement.
Section 2: Safety Relief Systems and Emergency Response Diagnostics
Integrated Safety Relief Failure Modes
Many modern regulators, such as the Francel B25/37mb with integrated safety relief, combine pressure regulation and safety relief in one compact unit. When the relief function fails, your plant loses critical overpressure protection.
Relief Valve Stiction (Sticking)
The relief valve poppet can stick in the closed position due to corrosion, particle accumulation, or dried residue from previous gas leakage.
Diagnostic test: Increase inlet pressure beyond the relief setpoint (documented on the regulator nameplate). For the Francel B25/37mb, this setpoint is typically marked on the body. If outlet pressure continues to rise above the setpoint without relief gas venting from the safety outlet port, stiction is present.
Corrective action: Gently tap the relief valve body with a soft-faced hammer to break the stiction. Do this carefully with the system depressurized. If tapping fails, disassemble and clean the poppet with compressed air and a soft brush. Apply a thin coat of silicone-based lubricant (do NOT use petroleum lubricants, which can react with some gases) before reassembly.
Relief Setpoint Drift
The relief setpoint can shift due to spring fatigue or adjusting screw migration (if manually adjustable).
Diagnostic test: Apply inlet pressure in 0.5 bar increments. Record the exact pressure at which gas first vents from the safety outlet. Compare to the labeled setpoint. A deviation of more than ±2% indicates drift.
Corrective action: If the regulator features an adjusting screw, loosen the locknut and turn the screw clockwise to increase setpoint or counterclockwise to decrease. Make small turns (¼ turn or less) and retest. After achieving the correct setpoint, tighten the locknut firmly to prevent future migration. If the regulator has no adjustable screw, replacement is required.
Relief Port Blockage
The relief outlet port (separate from the vent) may become blocked, preventing the safety relief from exhausting excess pressure.
Diagnostic test: With inlet pressure at or above the relief setpoint, listen and feel for gas venting at the relief outlet port. If no vent is detected, suspect blockage.
Corrective action: Clear the outlet port by inserting a thin, flexible wire probe or blowing compressed air through it from the outside. Ensure all debris exits the port and does not re-enter the regulator body. After clearing, test the relief function again at the setpoint pressure.
Section 3: Installation, Adjustment, and Pressure Testing Procedures
Pre-Installation Inspection Checklist
Before installing any gas valve or regulator, perform this inspection to avoid field failures:
- Visual inspection: Check for dents, corrosion, or visible cracks in the body. Do NOT install damaged units.
- Pressure rating verification: Confirm that the regulator's rated pressure (typically marked on the nameplate) equals or exceeds your maximum inlet pressure. For example, if your inlet is 100 bar, the regulator must be rated for at least 100 bar.
- Connection compatibility: Verify that inlet, outlet, and vent ports match your piping (thread size, type—metric or BSP). Mismatched connections are a common installation error.
- Diaphragm and seal condition: If replacing an existing regulator, visually inspect the diaphragm and seals for cracks or deformation. Do NOT reuse damaged seals.
- Gas compatibility: Confirm that the regulator materials are compatible with your specific gas. Some gases (e.g., oxygen) require specialized regulators with oxygen-compatible seals and materials.
Outlet Pressure Calibration Procedure
After installation, calibrate the outlet pressure using this method:
1. Depressurize the system: Close the inlet isolation valve and slowly open the vent or outlet port to release all pressure. Wait 30 seconds to ensure complete depressurization.
2. Connect a calibrated pressure gauge: Attach a precision pressure gauge (±1% accuracy minimum) to the outlet port. For the Francel B25/37mb, ensure the gauge is rated for at least 50 bar to accommodate overpressure testing.
3. Establish baseline pressure: Open the inlet isolation valve and allow gas to flow to the regulator. Record the outlet pressure on the gauge with no downstream load (static condition).
4. Adjust for setpoint: If the outlet pressure differs from your target, locate the adjusting screw (usually recessed under a cover or labeled on the body). For the Francel model, turn the screw clockwise to increase pressure or counterclockwise to decrease. Make ¼-turn adjustments and wait 5 seconds between adjustments for pressure to stabilize.
5. Load testing: Slowly open a downstream control valve to increase gas flow. Monitor outlet pressure under load. Pressure should remain stable (±2% variance is acceptable). If pressure drifts during flow, investigate the root causes outlined in Section 1.
6. Documentation: Record the final outlet pressure setting, date, technician name, and gauge serial number in your maintenance log. This creates a baseline for future troubleshooting.
End-of-Stroke Contact Valve Testing
For pneumatic systems using end-of-stroke contact valves like the Elektrogas VMM 20-25, perform this monthly test:
1. Pressurize the system to the valve's rated pressure (6 bar for the VMM 20-25).
2. Operate the pneumatic actuator (cylinder or motor) through a complete cycle.
3. At the end of each stroke, listen for a distinct electrical switch activation sound (usually a audible click).
4. If the click is absent or delayed, the valve contact may be fouled. Depress the contact plunger manually using a 3 mm Allen wrench (the adjustment tool specified for the VMM 20-25) to break any stiction.
5. Repeat the cycle test. If the contact fails to activate after manual intervention, the valve cartridge requires replacement.
Section 4: Preventive Maintenance and Long-Term Reliability
Monthly Inspection Tasks
- Visual leak detection: Inspect all regulator body seams, connections, and vent ports for visible gas leakage (use soap solution to detect pinhole leaks).
- Gauge reading check: Compare outlet pressure to the labeled setpoint. A difference of more than ±5% indicates service is needed.
- Vent port patency: Ensure the vent port is unobstructed by running a gloved finger across it or listening for faint hissing during operation.
- Adjustment screw security: If your regulator has an external adjusting screw, confirm the locknut is tight. A loose screw can migrate and shift the setpoint.
Quarterly Deep Maintenance
- Filter replacement: If your system uses an upstream filter, replace the element every quarter (or per manufacturer guidance based on gas contamination levels). Blocked filters reduce inlet pressure and cause false regulation problems.
- Pressure gauge calibration: Have your outlet pressure gauge re-certified by an accredited calibration lab every 12 months, or immediately if readings seem inconsistent.
- Diaphragm and seal inspection: For regulators in continuous service, inspect the diaphragm and seals every 6 months. In high-temperature environments or with reactive gases, increase inspection frequency to 3 months.
- System flush: Once annually, depressurize the system and flush all piping and regulator passages with clean, dry nitrogen gas at low pressure to remove accumulated contamination.
Gas Quality and Contamination Management
Most gas valve and regulator failures in Singapore plants result from moisture and particulate contamination introduced by supply lines, fittings, or atmospheric exposure during maintenance.
Control strategy:
- Install a coalescing filter upstream of your primary regulator to remove moisture and aerosol particles to 0.1 µm.
- Use only metal-to-metal or PTFE-sealed connections (avoid rubber gaskets, which degrade in tropical humidity and release degradation products into the gas stream).
- When opening any gas line for maintenance, immediately cap all open ports with clean, dry plugs to prevent moisture ingress.
- For systems idle for more than one week, depressurize and replace the gas with clean, dry nitrogen before restart.
Regulatory Compliance in Singapore
Gas handling in Singapore is regulated by the Ministry of Manpower (MOM) under the Factories Act. Ensure your maintenance program includes:
- Annual pressure equipment safety certification for regulators operating above 0.5 bar outlet pressure.
- Documentation of all adjustments, repairs, and component replacements.
- A qualified supervisor (Level 1 or Level 2 Pressure Equipment certification) overseeing all gas valve maintenance.
- Regular refresher training for technicians on your specific regulator models.
3G Electric's product specialists can assist in sourcing replacement cartridges, seals, and components compatible with your existing regulators, minimizing downtime and maintaining compliance documentation.
Quick Reference Troubleshooting Table
| Symptom | Most Likely Cause | First Diagnostic Step | Corrective Action |
|---------|-------------------|-----------------------|-------------------|
| Outlet pressure slowly increases over time | Diaphragm degradation | Measure static vs. dynamic pressure | Replace diaphragm cartridge |
| Outlet pressure fluctuates wildly during operation | Spring preload loss | Increase inlet pressure by 0.5 bar and observe outlet response | Replace internal spring; recalibrate setpoint |
| Outlet pressure exceeds setpoint and won't drop | Vent port blockage or relief stiction | Inspect vent port visually; listen for vent gas flow | Clear vent port; tap relief poppet to break stiction |
| Slow pressure decay when outlet is isolated | Seat leakage (internal bypass) | Close downstream valve; monitor pressure drop over 5 min | Clean seat surface; install upstream filter |
| Relief valve doesn't vent at setpoint | Relief spring fatigue or adjustment screw migration | Apply inlet pressure above setpoint and check relief outlet for gas venting | Adjust or replace relief spring; tighten locknut |
| No outlet pressure even with high inlet pressure | Pilot drain line blockage | Depressurize and listen at vent port; it should emit gas when pressurized | Flush drain line with reverse compressed air flow |
| End-of-stroke valve contact doesn't activate | Contact plunger stiction (pneumatic systems) | Manually depress plunger with Allen wrench; listen for electrical click | Clean contact surfaces; adjust plunger height |
Key Takeaways for Plant Managers
1. Root cause analysis is faster than trial-and-error replacement. Systematic diagnostic procedures (static vs. dynamic pressure testing, vent port inspection, seat leakage tests) pinpoint the actual failure mode in under 30 minutes, avoiding unnecessary component replacements.
2. Preventive maintenance on filters and seals prevents 80% of regulation failures. Contamination is the primary driver of diaphragm degradation and seat leakage in Singapore's humid environment. A simple quarterly filter replacement and annual system flush eliminate most chronic problems.
3. Pressure drift is a leading indicator of imminent failure. When you notice outlet pressure drifting by more than ±5% from setpoint, schedule maintenance within the week. Delaying intervention increases the risk of complete regulation failure and unplanned production shutdowns.
4. Documentation ensures compliance and faster future diagnostics. Record the outlet pressure setting, adjustment date, technician name, and gauge serial number every time you calibrate a regulator. This baseline makes it easy to spot problems during routine checks.
5. Safety relief testing is non-negotiable. Quarterly testing of relief function (applying pressure above setpoint and confirming vent gas flow) takes 10 minutes and ensures your plant maintains overpressure protection required by Singapore MOM regulations.
With over 35 years supporting industrial operations across Singapore and the region, 3G Electric has helped thousands of plant managers achieve reliable, safe gas handling systems. We supply a comprehensive range of replacement components and cartridges for all major regulator brands, and our technical team is available to support your diagnostics via phone or on-site consultation.
