Understanding Burners & Combustion Failure Modes in Tropical Climates
Burners & Combustion equipment operates under extreme conditions across Southeast Asia. High humidity, salt-laden air in coastal regions, and rapid temperature cycling create accelerated wear patterns that differ significantly from temperate industrial environments. Over 35 years serving the region, 3G Electric has documented that premature failures in tropical climates stem primarily from three sources: moisture ingress into control systems, fuel contamination in storage tanks, and thermal stress from rapid cycling.
The first step in effective troubleshooting is understanding your specific failure signature. When a burner shuts down unexpectedly, the issue rarely appears at the ignition point—instead, it originates upstream in the control relay or pressure monitoring stage. Maintenance teams must develop a systematic approach to isolate problems before they cascade into complete system shutdown.
The humid environment of Southeast Asia accelerates corrosion on relay contacts and pressure switch diaphragms. Salt spray near coastal industrial facilities penetrates even IP-rated enclosures over time. Temperature swings between daytime peak and night cooling create condensation inside panels, bridging electrical connections and triggering false safety shutdowns. Recognizing these environmental factors allows you to implement targeted prevention rather than reactive repairs.
Diagnostic Procedures: From First Failure Sign to Root Cause
Step 1: Document the Failure Pattern
When a burner control system fails, begin by recording the exact sequence of events. Note whether the burner:
- Fails to ignite on demand
- Ignites successfully then shuts down after seconds
- Cycles repeatedly between on and lockout
- Operates normally then fails under specific load conditions
This pattern tells you where the problem originates. Ignition failures typically indicate flame detection issues or relay malfunction. Cycling failures suggest pressure switch drift or contaminated fuel. Successful ignition followed by shutdown points to safety interlocks responding to false signals.
Step 2: Verify Fuel Quality and Supply
Fuel contamination causes 40% of burner failures in tropical regions. Water absorption in stored diesel and heavy oil accelerates dramatically in humid climates. Before assuming control system failure, drain a fuel sample from the lowest point of your storage tank—not from the supply line where sediment hasn't settled.
Inspect the sample in clear glass:
- Clear liquid indicates acceptable condition
- Cloudiness or visible particles mean immediate filtration required
- Water layer at the bottom necessitates tank drainage and inspection
- Dark discoloration suggests microbial growth in the tank
If fuel quality is compromised, clean or replace fuel filters, drain tanks, and treat with biocide appropriate to your fuel type. Many maintenance teams skip this step, leading to repeated control system replacement when the actual problem is preventable fuel degradation.
Step 3: Test Pressure Switch Response
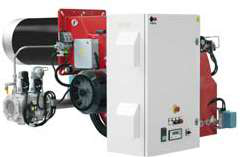
The Kromschroder DG 50U/6 pressure switch is the gateway control point for most industrial burners. This component monitors both fuel supply pressure and combustion air pressure, initiating shutdown if either falls below safe operating range.
To diagnose pressure switch failure:
Mechanical Testing: Gently tap the pressure switch housing with a plastic mallet while the system is idle. If the burner suddenly ignites or changes state, the switch diaphragm has likely stuck due to corrosion or debris. This indicates immediate replacement is needed.
Electrical Testing: With the system powered down, use a multimeter set to continuity mode. Connect probes to the switch terminals. At rest (no pressure applied), the switch should show open circuit (no continuity). Gradually increase system pressure by hand pump if the unit has a test port. Continuity should close at the switch's rated setpoint (typically 0.8–1.2 bar for fuel pressure). If continuity changes at incorrect pressure or doesn't change at all, replace the switch.
Environmental Assessment: Inspect the switch for corrosion on the external connector and housing. Salt spray and moisture penetration are common in Southeast Asian facilities. White or green crystalline deposits indicate active corrosion. Even if electrical testing appears acceptable, replace switches showing visible corrosion—they will fail within weeks as corrosion migrates internally.
Step 4: Evaluate Flame Detection and Safety Relay Function
The Siemens LFL 1.622 safety relay manages flame monitoring and coordinates ignition timing with air supply. Failures here create the most frustrating intermittent problems—the system works unpredictably, making diagnosis challenging.
Flamme detection problems manifest as:
- Intermittent "flame failure" lockouts despite visible flame
- Burner cycling every 10–20 seconds during operation
- Successful ignition but immediate shutdown
Test flame detection using a diagnostic approach:
Visual Inspection: Access the flame sensor rod (typically a ceramic electrode in the combustion head). Look for soot, carbon buildup, or white salt deposits. Even light coating reduces signal strength by 50%. Clean with a soft brass brush or compressed air. Do not use wire brushes or abrasive pads—they damage the ceramic surface.
Signal Strength Check: If your relay unit supports it, enter diagnostic mode (consult your specific model manual). Record baseline flame signal strength during normal operation. Then gradually block the sensor with a non-flammable material (aluminum foil works well). The system should detect signal loss within 3 seconds and shut down safely. If shutdown takes longer, the sensor or relay logic is degraded.
Humidity Assessment: In coastal areas with salt-laden air, check the relay enclosure for moisture. Even slight condensation on the circuit board or connectors causes intermittent signal loss and false alarms. Install desiccant cartridges inside relay enclosures and ensure ventilation holes aren't blocked by dust or spider webs.
Step 5: Inspect the Burner Control Relay
The Kromschroder BCU 570WC1F1U0K1-E relay orchestrates the entire ignition sequence. This unit receives signals from all safety interlocks and decides whether to permit ignition.
To diagnose relay failure:
Visual Component Check: Examine all visible connections and solder joints. Look for:
- Discolored solder joints (indicates heat damage or moisture corrosion)
- Burned-looking components or charred traces
- Loose connector pins or corroded contacts
- Any sign of potting compound failure (cracks or seepage)
If you observe these conditions, relay replacement is necessary—internal damage will cause intermittent failures that are impossible to predict.
Contact Testing: If relay contacts are accessible, use a multimeter to check continuity. Each contact pair should show clear open or closed states with no in-between readings. Hesitant or noisy contact closure indicates wear. While the relay may still function, it will fail suddenly under load.
Replacement Timing: Even if current testing shows acceptable function, replace relays that have been in service for 8+ years in tropical climates. The cost of preventive replacement is negligible compared to unplanned downtime during critical production periods.
Practical Component Replacement and Reinstallation
Removing Old Components Safely
Before touching any component, turn off main electrical power and wait 5 minutes. Use a multimeter to verify absence of voltage on all terminals. Even latching relays can store charge.
For pressure switches and flame sensors: Use two wrenches—one to hold the body, one to turn the connector. This prevents twisting the internal connection, which damages the seal.
For relays: Take photographs of all terminal connections before removing wires. Photo documentation prevents reconnection errors that can cause immediate malfunction or safety hazards.
Installing Replacement Components
When installing new components, never reuse old connectors or terminal covers. Corrosion inside connectors causes intermittent failures. Replace with sealed connectors rated for humid tropical environments (IP67 minimum).
For fuel supply connections: Use new gaskets or O-rings every time you disconnect. Old rubber hardens and leaks, contaminating fuel or losing pressure. Use stainless steel fasteners instead of zinc-plated; they resist coastal salt-spray corrosion significantly longer.
For electrical connections: Apply a thin coat of dielectric grease to all connectors before mating. This displaces moisture and prevents corrosion initiation. Avoid regular petroleum grease—it attracts dust and accelerates degradation.
Post-Installation Verification
After component replacement, run a full system startup sequence:
1. Apply power with the system in standby mode. Listen for relay clicking and verify indicator lights activate normally.
2. Request a burner start signal. Observe the sequence: air damper opens, ignition delay occurs, spark/pilot appears, main fuel valve opens, flame detection confirms.
3. Allow the burner to run at full load for 5 minutes. Verify stable pressure readings and no unexpected cycling.
4. Request system shutdown. Confirm all fuel valves close, ignition stops, and the system enters safe lockout state.
5. Repeat the startup-shutdown cycle three times. Intermittent problems often appear on the second or third attempt.
Only after successful cycling should you declare the repair complete and resume normal operations.
Extending Equipment Life: Maintenance Practices for Southeast Asian Conditions
Environmental Control in Equipment Enclosures
The tropical climate is your primary adversary. Implement aggressive environmental controls:
Moisture Management: Install desiccant cartridges inside all control enclosures. Check and replace monthly—once saturated, they accelerate corrosion. Choose silica gel with color-change indicators; they show saturation visually.
Ventilation: Ensure enclosure vents are clean and unobstructed. Dust blocks air circulation, trapping heat and moisture inside. Check vents weekly and clean with compressed air. Consider installing fine mesh screens to exclude insects and salt spray while maintaining airflow.
Cable Entries: Use sealed cable glands on all external connections. Standard glands allow moisture migration along cable sheaths. Sealed varieties (M20 or M25 rated IP67) prevent salt-laden air from entering around wires.
Scheduled Inspections and Preventive Replacement
Don't wait for failure. Establish a maintenance calendar based on equipment age and tropical climate severity:
Every 3 Months: Visually inspect all control enclosures for moisture, dust accumulation, or corrosion. Clean vent screens and replace desiccant cartridges.
Every 6 Months: Test pressure switches mechanically (tap test) and electrically. Check flame sensor cleanliness. Inspect all external connections for corrosion.
Every 12 Months: Replace fuel filters and drain tanks to remove accumulated water and sediment. Test entire control sequence with manual startup commands. Replace any connector housings showing visible corrosion.
Every 3 Years: Replace pressure switches and flame sensors regardless of test results. The cost is modest insurance against failures during peak production periods. Older components degrade unpredictably in tropical climates.
Every 5 Years: Consider replacement of control relays even if functioning properly. Potting compound deteriorates, internal traces corrode, and contact wear becomes critical in humid environments.
Fuel Management in Tropical Storage
Fuel is often the overlooked component. Implement strict storage protocols:
Tank Maintenance: Every 6 months, drain the lowest 5% of tank volume to remove accumulated water and sediment. This single practice prevents more burner failures than any other intervention.
Filtration: Install or upgrade fuel filters to 20-micron absolute. In Southeast Asia, fine particle contamination increases dramatically. Oversized filters rated for your flow rate reduce maintenance labor while catching more contaminants.
Biocide Treatment: Add appropriate biocide to tanks annually, even if water content appears minimal. Microbial growth in humid climates is inevitable; preventive treatment avoids sudden filter blockage and fuel system corrosion.
Delivery Records: Track fuel supplier quality. If contamination spikes after deliveries from a particular source, investigate before accepting future loads.
Conclusion
Burners & Combustion equipment failures in Southeast Asia are rarely mysterious when approached systematically. Environmental factors create accelerated wear patterns that differ from other regions, requiring maintenance teams to understand moisture control, fuel quality management, and component degradation timelines.
With 35 years of experience supplying industrial equipment across tropical climates, 3G Electric understands these challenges intimately. By implementing the diagnostic procedures and preventive maintenance practices outlined here, your maintenance team can extend equipment life from the typical 5–7 years to 10+ years while dramatically reducing unplanned downtime.
The key insight: component replacement before failure during scheduled maintenance periods costs far less than emergency repair during peak production. Apply this principle consistently, and your burner control systems will deliver reliable service despite challenging environmental conditions.