Understanding Burners & Combustion Control System Architecture
Burners & Combustion systems in modern industrial plants rely on integrated electrical control networks that manage ignition, flame detection, fuel delivery, and safety interlocks. With over 35 years of experience distributing industrial equipment across Southeast Asia, 3G Electric has observed that 60–70% of burner downtime stems not from the burner itself, but from failures in the control relay, flame detection circuit, or safety interlock components.
The control system typically includes: a burner control relay that sequences the startup, a flame detector (UV or ionization) that monitors combustion, pressure switches that verify air and fuel supply, and safety interlocks that prevent hazardous conditions. When one component fails, the entire burner shuts down—often with minimal diagnostic information.
Understanding this architecture helps plant managers distinguish between a faulty burner and a control system fault, reducing troubleshooting time and preventing unnecessary equipment replacement.
Diagnosing Control Relay Failures
Identifying Control Relay Symptoms
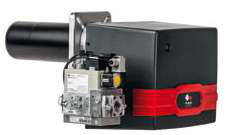
A burner control relay is the brain of the combustion system. It receives input signals from flame detectors and pressure switches, then outputs commands to solenoid valves, ignition electrodes, and damper motors. The Kromschroder Relay BCU 570WC1F1U0K1-E is a common choice in Southeast Asian plants because it supports both direct ignition and intermittent/continuous pilot modes, meeting EN 746-2 and EN 676 safety standards.
Common control relay failure symptoms include:
- No ignition attempt: The relay receives the burner start signal but does not energize the ignition circuit. The burner does not light, and no flame is detected.
- Repeated lockouts: The burner ignites briefly, then immediately cuts fuel and displays a flame failure code.
- Stuck fuel solenoid: The relay energizes the fuel valve but does not de-energize it when flame is lost, causing runaway combustion or fuel overflow.
- Frozen air damper: The damper motor receives no modulation signal, staying fixed in one position regardless of load demand.
Step-by-Step Control Relay Troubleshooting
Step 1: Verify Input Signals
Before assuming the relay is faulty, confirm that it is receiving correct input from the flame detector and pressure switches. Use a multimeter to measure voltage at the flame detector terminal and pressure switch terminals during a burner start attempt. If the flame detector shows 0V during ignition, the detector circuit is open or the detector has failed.
Step 2: Test the Relay with a Manual Reset
Most modern relays like the BCU 570 have a manual reset button. Press it once per startup cycle only. Repeatedly pressing the reset button without allowing the burner to stabilize can mask an underlying problem—such as incomplete air pressure buildup or a slow flame detector response.
Step 3: Measure Relay Output Voltages
With a voltmeter, check the output terminals that feed the solenoid valve and ignition transformer. During a successful start sequence, you should see 24V DC (or the system voltage) at the ignition output for 5–10 seconds, then fuel solenoid output for 10–15 seconds. If ignition output is present but fuel output is absent, the relay's internal fuel valve circuit has failed and the relay requires replacement.
Step 4: Check for Nuisance Shutdowns During Operation
If the burner ignites successfully but shuts down 30–60 seconds into operation (after the pilot lights), the flame detector is likely fluttering or oscillating. This is different from a relay fault: the relay is working correctly by cutting fuel when it detects an unstable flame. The actual problem is flame instability, which requires checking air supply, fuel pressure, or nozzle condition—not the relay.
When to Replace vs. Reset
Do not automatically replace the control relay. Many nuisance shutdowns are resolved by cleaning the flame detector window (dust and soot accumulate in high-humidity Southeast Asian environments), adjusting air shutter position, or verifying fuel pressure. Replace the relay only when:
- Output voltage measurements show 0V at the fuel or ignition terminal during a start sequence.
- The relay trips its internal thermal overload repeatedly within minutes.
- You have confirmed all input signals (flame, air pressure, fuel pressure) are correct, yet the relay does not energize its outputs.
Flame Detection and Interlock Circuit Diagnostics
UV and Ionization Flame Detectors Compared
Flame detectors come in two types: UV (ultraviolet) and ionization. The Siemens Relay LFL 1.622 is a safety control unit that handles medium to high power gas, oil, or dual-fuel burners and includes both UV and ionization flame monitoring capability.
UV Detectors respond to ultraviolet radiation emitted by the flame. They are fast-responding (150–300 ms) and immune to ambient light indoors, but they fail if the burner chamber becomes dark from soot buildup or if the optical window is obscured.
Ionization Detectors sense the electrical conductivity of ionized gas in the flame. They are slower (400–800 ms) but more resistant to soot, though they can produce false signals in extremely high humidity or after water spray cooling events.
In Southeast Asian plants with high ambient humidity and frequent water cooling systems, UV detectors are often more reliable if the burner chamber is kept clean. Ionization detectors require more frequent calibration.
Flame Detector Window Fouling
Flame detector windows are the most common failure point in Southeast Asia. Dust, insect nests, and combustion byproducts accumulate on the window, blocking the detector's signal.
Diagnosis: Power off the burner. Remove the flame detector probe from the burner. Visually inspect the window (a small transparent dome). If you see discoloration, dust, or buildup, cleaning is needed.
Remedy: Use only soft, lint-free cloths and distilled water (or the burner manufacturer's recommended cleaner). Do not use abrasive pads or strong solvents, which may damage the internal optical components. After cleaning, reinstall the detector and run a test cycle. If the burner now stays lit for more than 2 minutes, fouling was the problem.
Pressure Switch Interlock Testing
The Kromschroder Pressure switch DG 50U/6 is a SIL 3-rated safety component used to verify that air pressure or fuel pressure has reached the setpoint before allowing the burner to ignite. If this switch is faulty or out of adjustment, the burner will not start—even though air and fuel are present.
Diagnosis Procedure:
1. Locate the pressure switch on the air or fuel line (consult your burner manual for exact location).
2. Start the burner and allow it to run (or simulate a start with the ignition transformer only, with no fuel).
3. Listen for an audible click inside the switch as air/fuel pressure rises. A click indicates the switch contacts have closed.
4. If no click occurs, measure the actual pressure at the gauge on that line. Compare to the switch's setpoint (often stamped on the body).
5. If measured pressure exceeds the setpoint but the switch does not click, the internal contacts are stuck and the switch must be replaced.
Do not adjust the setpoint screw without proper training. An incorrect adjustment can cause the burner to operate unsafely or prevent legitimate startup.
Systematic Troubleshooting Workflow for Plant Managers
Decision Tree for Quick Diagnosis
When a burner fails to start or shuts down unexpectedly, follow this sequence:
Q1: Does the control relay light up when you press the start button?
- No: Check 24V power supply to the relay. Verify the emergency stop is not engaged. Test the start switch with a voltmeter. If power is present but the relay does not energize, the relay may have an internal short—replace it.
- Yes: Continue to Q2.
- No: Verify the relay is sending 24V DC to the ignition circuit. If voltage is present, check the ignition transformer for cracks or water damage (common in humid environments). If no voltage, the relay's ignition output has failed—replace the relay.
- Yes: Continue to Q3.
- No: Verify 24V is reaching the solenoid coil. If voltage is present, the solenoid coil is burned out—replace the solenoid valve. If no voltage, the relay's fuel output circuit has failed.
- Yes: Continue to Q4.
- No: Check fuel pressure at the gauge. Typical setpoints are 0.5–2 bar for gas. If pressure is below setpoint, the fuel supply is blocked. Check fuel pump, filter, and shut-off valve upstream. If pressure is correct but no flame appears, the ignition electrodes may be wet or the air shutter may be closed—adjust air shutter by 1/4 turn and retry.
- Yes: Continue to Q5.
- No: The flame is unstable, likely due to air shutter misalignment, incomplete combustion, or a fluttering flame detector signal. Clean the flame detector window. Adjust air shutter. Check for air leaks in the burner head. If the flame detector window is clean and air shutter is correct, reduce the air supply slightly and observe flame stability.
- Yes: The burner is operating normally.
Documentation and Parts Inventory
Maintain a record of each troubleshooting session: date, symptoms, steps taken, and resolution. This helps identify patterns. For example, if flame detector window fouling occurs monthly, increase cleaning frequency to bi-weekly or install a protective mesh around the detector window.
Keep spare parts on hand for quick replacement:
- One spare control relay matched to your system (such as the BCU 570 or LFL 1.622).
- One spare flame detector probe (clean and calibrated).
- One spare pressure switch set to your system's air or fuel setpoint.
- Ignition transformer, solenoid valve coil, and damper motor (check your burner manual for part numbers).
With 35+ years of industrial equipment distribution experience, 3G Electric recommends keeping a second identical burner control relay on the shelf. When a relay fails, you can swap it in within minutes—minimizing downtime while the original relay is sent to the manufacturer for testing and repair.
Advanced Troubleshooting: Modulation and Load Control Issues
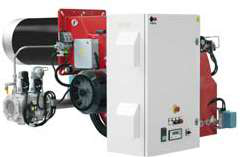
Industrial burners like the FBR GAS XP 60/2 CE TC EVO and the FBR KN 1300/M TL EL feature modulating controls that adjust air damper and fuel flow to match load demand. When the burner ignites, it runs at low fire, then ramps to high fire. If this ramp is jerky or the burner oscillates between low and high fire, the modulation loop is unstable.
Modulation Instability Diagnosis:
1. Observe the air damper motor. During a start and ramp-up sequence, the damper should open smoothly without hesitation.
2. Listen to the fuel solenoid valve. It should modulate (open and close) smoothly, not chatter or click repeatedly.
3. Check the temperature sensor or load signal that feeds the control relay. On hot oil heaters, verify the temperature transmitter (thermocouple or RTD) is reading correctly and is not stuck at a fixed value.
4. Verify that the air supply to the fuel nozzle is adequate. Low air pressure may prevent complete atomization, causing flame instability that the control system interprets as a loss of load.
Modulation tuning is system-specific. Consult your burner manufacturer's manual before adjusting damper linkage or control gains. Incorrect adjustments can damage the equipment or create unsafe conditions.
Key Takeaways for Plant Managers
- Control relays, flame detectors, and pressure switches fail more often than the burner itself. Diagnose the control system before replacing expensive burner components.
- Flame detector window fouling is the leading cause of nuisance shutdowns in humid climates. Establish a monthly cleaning schedule.
- Pressure switches are safety devices; do not adjust them without training. Verify measured pressure against the switch setpoint, and replace the switch if out of range.
- Modulation instability requires systematic observation of damper, solenoid, and sensor behavior—not random adjustments.
- Keep spare control relays and flame detectors on hand. Quick replacement reduces downtime; faulty components can be tested offline and repaired or refurbished.
3G Electric's 35+ years of experience in Southeast Asian industrial markets means we understand the specific environmental challenges—humidity, dust, thermal stress—that affect burner control systems in your region. Consult our technical team when selecting replacement components to ensure compatibility with your exact burner model and operating conditions.