Understanding Burners & Combustion Flame Stability Fundamentals
Flame stability in industrial burners depends on the precise balance between fuel delivery, combustion air supply, and ignition conditions. Unstable flames—characterized by flickering, lifting, or extinction—waste fuel, increase emissions, and trigger safety shutdowns that disrupt production schedules. With 35+ years of experience in industrial equipment distribution, 3G Electric has observed that most flame stability problems originate from three root causes: inadequate or turbulent combustion air, degraded flame monitoring sensors, and mismatched burner air damper response timing.
When a flame becomes unstable, the burner control system detects loss of signal and initiates a safety lockout, requiring manual reset and system re-ignition. Understanding the interaction between air intake velocity, fuel gas/oil pressure, nozzle design, and flame detector sensitivity allows maintenance teams to diagnose and correct these issues before they escalate into extended downtime. This guide focuses on practical field diagnostics that your team can perform with basic instruments.
Section 1: Combustion Air Supply Diagnostics and Correction
Air Intake and Fan Performance Assessment
The combustion air fan is the foundation of flame stability. A properly functioning fan delivers consistent airflow at the correct velocity to create optimal combustion conditions. Begin diagnosis by checking the air intake pathway for blockages—dust accumulation on intake screens and louvers is the most common culprit.
Procedure for Air Intake Inspection:
- Stop the burner and verify all safety interlocks are engaged
- Visually inspect intake screens and louvers for dust, lint, or debris buildup
- Use a soft brush or compressed air (max 5 bar) to clean screens without damaging mesh
- Check flexible ducting for kinks, crushing, or internal blockages by running a visual inspection light through the duct
- Verify that damper linkages move freely and are not stuck in partially closed position
Fan Speed and Airflow Measurement
After clearing obstructions, confirm that the fan is delivering adequate airflow. Air velocity at the burner air inlet should typically fall within 8–15 m/s for most industrial burners, though your specific model may vary.
Procedure for Airflow Verification:
- Use a vane anemometer (suitable for 2–20 m/s range) to measure air velocity at the burner air inlet
- Record measurements at three points across the inlet: center, and 25–75% positions from edge
- Calculate average velocity; velocity variance between points should not exceed ±10%
- If readings are 20% below specification, clean the fan impeller and bearing surfaces, and verify motor coupling alignment
- If airflow remains low after cleaning, the fan motor may require bearing replacement or impeller resurfacing
Damper Response and Air Modulation
The air damper regulates combustion air volume during burner modulation. A sluggish or stuck damper causes unstable flame conditions, particularly during load changes.
Procedure for Damper Testing:
- Manually operate the damper linkage (with burner OFF) to confirm smooth, unrestricted movement across full range
- Listen for grinding sounds or feel for binding—both indicate bearing wear or debris
- Measure damper actuation time from closed to open position; this should typically complete in 3–5 seconds
- If actuation is slow, apply a light penetrating lubricant to pivot points and linkage joints; do not use heavy grease, which collects dust
- Check the damper position feedback signal if your burner has electronic modulation; a faulty sensor will cause the control system to hunt for the correct position, creating oscillating airflow and flame flutter
Section 2: Flame Monitoring Sensor Diagnosis and Recalibration
Flame Detector Types and Signal Degradation
Flame stability depends entirely on the flame monitoring sensor's ability to detect the flame continuously and reliably. Industrial burners commonly use two flame detection technologies: ultraviolet (UV) sensors and ionization sensors. UV sensors detect the ultraviolet radiation emitted by the flame, while ionization sensors measure electrical conductivity across the flame gap.
Both sensor types experience signal degradation over time due to:
- Optical fouling: UV lenses accumulate soot, dust, or condensation, reducing light transmission
- Electrode erosion: Ionization electrodes corrode due to fuel combustion byproducts and electrical discharge
- Sensor aging: Both technologies lose sensitivity after 5–7 years of continuous operation
- Environmental contamination: Oil mist or humidity in the combustion chamber interferes with signal clarity
UV Sensor Cleaning and Recalibration
UV sensors are sensitive instruments that require careful handling.
Procedure for UV Sensor Service:
- Switch the burner to OFF and allow the combustion chamber to cool below 40°C
- Locate the UV sensor optical window (usually a small transparent dome or flat lens facing the flame region)
- Use lens cleaning paper (type specified by sensor manufacturer) and isopropyl alcohol to gently clean the optical window; never use cloth or paper towels, which scratch the lens
- Allow the lens to dry completely before re-energizing the sensor
- Set the burner to run mode and measure the sensor signal output with an oscilloscope or multimeter (AC voltage); a healthy UV sensor typically outputs 5–8 V AC during flame operation
- If signal remains below 3 V AC after cleaning, the sensor internal element may have degraded; replacement is necessary
Many burner control systems (such as those incorporating the Siemens LFL 1.622 safety control unit) feature automatic flame signal gain adjustment. After cleaning a UV sensor, allow 30 seconds of flame operation for the control system to recalibrate signal levels before drawing conclusions about sensor health.
Ionization Sensor Electrode Cleaning
Ionization sensors detect flame by measuring the tiny electrical current generated across the flame. Over time, electrode surfaces accumulate carbon and ash.
Procedure for Ionization Electrode Service:
- Turn OFF the burner and allow cool-down
- Carefully remove the ionization sensor probe from the combustion chamber (if accessible)
- Use a soft wire brush or emery cloth to gently scrub the electrode surfaces; do not scratch or pit the electrodes
- If electrodes show deep pitting or significant erosion, replacement is more reliable than cleaning
- Reinstall the probe, ensuring it is positioned in the flame envelope as specified by the burner manufacturer
- Verify that the electrode gap (typically 3–5 mm) matches the design specification; measure with a feeler gauge
- Re-energize the burner and verify that the control system detects flame within 3 seconds of fuel ignition
Signal Cable and Connector Inspection
Flame sensor signal degradation often occurs not at the sensor itself, but in the signal cable or connector.
Procedure for Signal Path Verification:
- Visually trace the sensor signal cable from the sensor to the control relay
- Check for pinched, crushed, or kinked cable sections
- Inspect connector terminals for corrosion, oxidation, or loose contacts; gently clean oxidized terminals with a small brass brush and isopropyl alcohol
- Wiggle the connector while the burner is running; if the flame signal momentarily drops on a multimeter reading, the connector is intermittent and must be reseated or replaced
- For permanent installations, apply a thin layer of silicone dielectric grease to connector pins after cleaning; this prevents moisture penetration and oxidation
Control systems such as the Kromschroder BCU 570WC1F1U0K1-E burner control relay are highly sensitive to signal noise. A single loose connection can generate intermittent flame loss signals that appear unpredictable but are actually electrical artifacts.
Section 3: Combustion Process and Burner Modulation Coordination
Fuel Pressure and Air Intake Ratio Balancing
Stable combustion requires that fuel pressure and combustion air volume be properly coordinated. If air damper opening lags behind fuel valve opening during a load increase, the burner will momentarily experience a fuel-rich condition with weak flame and risk of flame extinction.
Procedure for Fuel and Air Coordination Verification:
- Measure the burner fuel inlet pressure using a precision pressure gauge (0–6 bar range for gas, 0–20 bar for oil)
- Record the pressure reading during idle (minimum fire) and full load (maximum fire) operating states
- Fuel pressure should increase smoothly without spikes; any abrupt pressure jump indicates a pressure regulator problem
- Simultaneously observe the air damper position feedback on the burner control display or via a position sensor signal
- The air damper should begin opening slightly before the fuel valve opens during a load increase; this provides a prepurge of combustion air and prevents rich transients
- If air damper response is delayed or sluggish relative to fuel valve command, adjust the damper actuation time or ramp rate in the control system (if the control system supports this parameter)
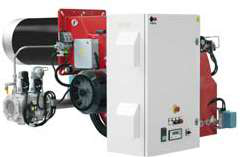
For heavy oil burners such as the FBR KN 1300/M TL EL dual-fuel burner, oil pressure typically ranges from 8–15 bar at the nozzle, and combustion air must be supplied at elevated pressure to atomize the oil correctly. Verify that your oil supply pump is delivering consistent pressure; pressure fluctuations greater than ±1 bar indicate pump wear or supply line restrictions.
Nozzle Condition and Atomization Quality
Burner nozzles atomize fuel into fine droplets that mix readily with combustion air. A partially plugged or worn nozzle produces large droplets that burn inefficiently and create unstable flame conditions.
Procedure for Nozzle Inspection:
- With the burner OFF and cold, carefully remove the nozzle from the burner assembly
- Hold the nozzle up to a light source and look through the outlet orifice; you should see clear light with no visible obstruction
- If obstruction is visible (carbon buildup, soot, or crystallized fuel residue), soak the nozzle in a suitable solvent (for gas burners: light mineral oil; for oil burners: diesel fuel or naphtha) for 15–30 minutes
- Use a soft brass brush or wooden pick to gently remove loosened deposits; never use steel wire or high-pressure water jets, which damage the precision orifice
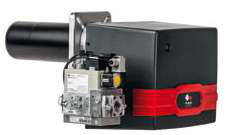
- For two-stage burners like the FBR GAS XP 60/2 CE TC EVO gas burner, verify that both the pilot and main stage nozzles are clear; the pilot nozzle is particularly small and vulnerable to plugging
- After cleaning, dry the nozzle and reinstall it, ensuring it seats fully without cross-threading
- Run the burner on low fire and observe the flame appearance; a properly atomized flame should be compact and blue (for gas) or predominantly yellow-orange with minimal smoke (for oil)
Section 4: Pressure Switch and Safety Interlock Verification
Combustion Air Pressure Switch Function
The air pressure switch (sometimes called a proof-of-air switch) verifies that combustion air is being supplied at adequate pressure before allowing fuel ignition. Failure of this switch causes lockout even though air may be present.
Procedure for Pressure Switch Testing:
- With the burner OFF, locate the air pressure switch (usually mounted on the air intake or air damper actuator)
- Visually inspect the switch for corrosion, moisture, or visible damage to the diaphragm
- Refer to the pressure switch rating plate and note the setpoint (typical range: 0.5–2.0 mbar differential for gas burners)
- Start the burner and run on low fire; observe whether the control system reports "air pressure confirmed" or a similar status message
- If the system does not confirm air pressure, measure the actual differential pressure at the switch ports using a sensitive manometer (0–10 mbar range)
- Common causes of air pressure switch false trips include:
- Diaphragm rupture (switch must be replaced)
- Electrical contact corrosion (clean contacts with fine sandpaper)
The Kromschroder DG 50U/6 pressure switch is rated SIL 3 and suitable for critical safety functions. If this switch is installed in your system and repeatedly generates false signals despite clean air supply, the internal mechanisms may have degraded and replacement is the appropriate remedy.
Flame Loss Response and Control Relay Operation
When flame is detected as lost, the control relay must immediately shut off fuel and trigger a safety lockout. Understanding this sequence helps distinguish between true flame loss and sensor artifacts.
Procedure for Flame Loss Response Verification:
- Start the burner and allow 2–3 minutes of stable operation
- Observe whether the control system reports continuous flame signal
- Gently block the flame with a non-flammable object (asbestos board or ceramic tile) for 2–3 seconds; the burner should immediately shut down and lockout
- Remove the blocking object and verify that the lockout remains active until you manually reset the control system
- Perform a full reset and restart the burner to confirm it ignites and establishes flame normally
- If the burner does not shut down when flame is blocked, the flame monitoring circuit may be failed or the control relay may be defective; do not operate the burner until repairs are complete
Conclusion: Preventive Monitoring and Performance Tracking
Flame stability problems are preventable through regular monitoring and timely component service. Establish a monthly routine of visual air intake inspection, quarterly flame sensor signal verification, and semi-annual nozzle inspection. Track flame signal voltage, air damper response time, and burner restart cycles in a maintenance log; a trend toward degrading values signals that major service is approaching.
With comprehensive knowledge of combustion air management, sensor diagnostics, and fuel modulation coordination, your maintenance team can sustain stable burner operation, minimize safety shutdowns, and extend equipment life. 3G Electric's technical support team stands ready to help you source replacement components or verify diagnostic findings through your local sales representative.