Understanding Burners & Combustion in HVAC Applications
Burners & combustion systems are critical components in industrial heating applications across Southeast Asia. For HVAC contractors, understanding the relationship between burner performance, combustion efficiency, and system integration directly impacts project success, customer satisfaction, and long-term equipment reliability.
3G Electric has distributed industrial heating equipment throughout Southeast Asia since 1990, working with contractors across Singapore, Malaysia, Thailand, and Indonesia. Over 35 years, we've observed that contractor expertise in burner installation and commissioning separates successful operations from those experiencing frequent downtime, efficiency losses, and safety incidents.
This guide focuses on practical installation, commissioning, and performance tuning knowledge that HVAC contractors can apply immediately to improve project outcomes.
Section 1: Pre-Installation Assessment and System Design
Conducting the Site Evaluation
Before selecting and installing any burner system, contractors must perform a thorough site assessment. This includes measuring available space, evaluating exhaust routing, assessing fuel supply capacity (gas pressure, oil viscosity, storage conditions), and identifying electrical requirements.
Key assessment steps:
- Fuel Supply Verification: Confirm natural gas pressure (typically 20-300 mbar for industrial burners), oil viscosity and temperature stability, or dual-fuel system requirements. Southeast Asian humidity and temperature variations significantly affect fuel delivery consistency.
- Air Supply Assessment: Evaluate combustion air availability, duct sizing, and draft conditions. Tropical climates with high ambient temperatures require larger air intake provisions.
- Electrical Infrastructure: Verify adequate power supply, grounding systems, and control circuit capacity. Document voltage stability and backup power needs.
- Space Constraints: Measure mounting surfaces, clearance for servicing, and access for annual maintenance—critical in compact Southeast Asian industrial facilities.
- Exhaust System Evaluation: Assess chimney diameter, draft capability, and corrosion resistance in humid environments. Poor exhaust design reduces combustion efficiency by 5-15%.
Selecting the Right Burner Type
Burner selection depends on fuel type, thermal power requirements, turndown ratio, and control capabilities needed. For example:
- Single-Stage Gas Burners suit applications requiring simple on/off operation with fixed output (typical 100-500 kW range). These are cost-effective for small HVAC systems.
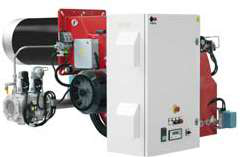
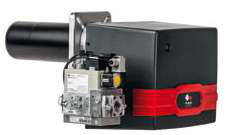
- Two-Stage Gas Burners provide high/low firing for modulation, improving efficiency in systems with variable load profiles. The FBR GAS XP 60/2 CE TC EVO delivers 116-630 kW with two-stage operation, ideal for facilities with fluctuating heating demands.
- Heavy Oil and Dual-Fuel Burners serve facilities without reliable gas supply. The FBR KN 1300/M TL EL dual-fuel heavy oil burner operates at 2-stage modulation (1700-11,500 Mcal/h), providing flexibility for regions with fuel supply variations.
Contractors should calculate actual thermal load, account for seasonal variations in Southeast Asia, and specify equipment with 20-30% margin above peak demand to ensure reliable performance.
Section 2: Installation Best Practices and Startup Procedures
Proper Burner Mounting and Alignment
Incorrect installation is the leading cause of combustion inefficiency and safety failures. Critical installation steps include:
- Mounting Surface Preparation: Ensure the boiler or furnace front face is flat, clean, and free from rust. Burners must mount perpendicular to the combustion chamber axis. Misalignment by even 5mm increases turbulence and reduces flame stability.
- Securing Burner Components: Use appropriate fasteners and torque specifications (typically 15-25 Nm for standard burner mounting). In high-vibration environments common in Southeast Asian industrial facilities, check fastener tightness monthly during the first 90 days of operation.
- Flame Detection Head Positioning: Position flame scanner/ionization probes at the burner flame center, not at chamber walls. Incorrect positioning leads to false flame signal readings and unwanted shutdowns.
- Fuel Line Installation: Separate gas and oil supply lines by at least 300mm to prevent thermal interference. Install isolation valves, pressure gauges, and strainers according to manufacturer specifications. Gas lines should slope upward toward the burner to prevent condensate accumulation in humid Southeast Asian climates.
- Control Air Lines: Keep pilot air and combustion air inlet lines protected from moisture and foreign objects. Clogged air lines are a common failure mode in tropical environments.
Electrical Control System Setup
Proper control wiring determines burner safety and operational reliability. Critical steps:
- Control Relay Installation: Install burner control relays like the Kromschroder Relay BCU 570WC1F1U0K1-E in clean, dry control cabinets with ambient temperature 0-50°C. This relay supports direct ignition and intermittent/continuous pilot modes, compliant with EN 746-2 and EN 676 standards.
- Pressure Switch Integration: Mount pressure switches such as the Kromschroder Pressure switch DG 50U/6 at the correct location (typically post-combustion air intake). This SIL 3 rated switch prevents unsafe operating conditions and must be tested during commissioning.
- Flame Monitoring Configuration: Install safety control units like the Siemens Relay LFL 1.622 to enable UV and ionization flame detection. This safety relay unit manages medium to high-power gas, oil, or dual-fuel burners with controlled air damper capability.
- Thermostat and Limit Control Wiring: Wire room thermostats and high-limit switches in series to ensure any safety condition immediately shuts down the burner.
- Cable Routing: Run all control cables separately from high-voltage power lines. Use appropriate gauge for 24V control circuits (typically 1.5-2.5mm²). Shield cables in electrically noisy environments common in Southeast Asian industrial sites.
Fuel System Preparation
- Gas System Commissioning: For new gas lines, perform pressure tests at 1.5× the normal operating pressure and maintain for 10 minutes without pressure drop. Purge all air from gas lines before first ignition.
- Oil System Commissioning: Pre-heat heavy oil burners to proper viscosity (typically 32-36 cSt for No. 2 oil, 50-100 cSt for No. 6 oil). Use high-quality filters rated 10 microns or finer to prevent nozzle clogging.
- Fuel Quality Verification: Test gas purity (ensure no siloxanes or liquid water) and oil viscosity/flash point to confirm fuel meets equipment specifications.
Section 3: Commissioning and Performance Verification
Step-by-Step Commissioning Procedure
Phase 1: Pre-Ignition Checks (No Fuel Supply)
1. Verify all fasteners are tight and electrical connections secure.
2. Test control circuits using a multimeter (24V output from ignition transformer).
3. Confirm pressure switch response: manually apply air pressure slightly above setpoint and verify electrical contact closure.
4. Check flame scanner continuity and resistance (varies by type; ionization probes typically 1-10 MΩ in absence of flame).
5. Run the burner safety circuit through one complete shutdown cycle without fuel to verify pilot cutoff, ignition interrupt, and lockout response.
Phase 2: Initial Ignition and Pilot Establishment
1. Supply fuel to the pilot circuit only (if applicable to your burner type).
2. Attempt pilot ignition and verify flame establishment within 3-5 seconds.
3. Confirm flame signal stability by observing control relay signal lamp (should remain steady without fluctuation).
4. Allow pilot to operate for 30 seconds and verify no nuisance shutdowns.
5. Test pilot flame extinguishment response: manually obstruct flame and confirm immediate control relay shutdown (within 1 second).
Phase 3: Main Burner Startup
1. Gradually supply fuel to the main burner circuit while monitoring flame establishment.
2. Verify main flame ignition within 10 seconds of fuel supply.
3. Allow 5 minutes of full-load operation to stabilize combustion and verify steady flame signal.
4. Perform load modulation test: if equipped with two-stage operation, cycle between high and low firing 5 times and confirm stable transitions.
5. Document all observations including flame signal strength, ignition delay times, and any system alarms.
Phase 4: Safety and Performance Testing
1. Pressure Switch Testing: Gradually reduce combustion air pressure and verify burner shutdown at the setpoint (typically 15-25 mbar). Record the exact shutdown pressure.
2. Flame Detection Shutdown: Block the flame scanner lens or interrupt the ionization circuit and confirm burner shutdown within 1 second.
3. Ignition System Verification: Measure ignition transformer secondary voltage (typically 8-12 kV for spark ignition).
4. Fuel Supply Verification: Confirm burner inlet gas pressure (for gas burners) or oil temperature/viscosity (for oil burners) matches specifications throughout the 10-minute test period.
5. Thermostatic Control Response: Set room thermostat to call for heat and verify burner ignition. Set thermostat below room temperature and verify burner shutdown within 2 minutes.
Combustion Analysis and Tuning
A portable combustion analyzer is essential for verifying burner efficiency and safety:
- Oxygen and CO₂ Measurement: Natural gas burners should achieve 3-5% O₂ and 9-11% CO₂ at full load. Oil burners typically run 2-4% O₂. Southeast Asian humidity affects readings; allow 10-minute warm-up for accurate measurements.
- Carbon Monoxide (CO) Verification: CO levels must remain below 100 ppm at full load for safety. High CO (>200 ppm) indicates incomplete combustion—typically from improper air/fuel mixing, clogged air intake, or burner fouling.
- Flue Gas Temperature: Measure stack temperature; typical targets are 150-200°C for gas and 180-250°C for oil. Excessively high flue gas temperature (>300°C) indicates draft problems or scaling inside the combustion chamber.
- Combustion Efficiency Calculation: Use the formula: Efficiency (%) = 100 - (Q×(t_exit - t_ambient))/(LHV × 100), where Q is mass flow, t_exit is flue gas temperature, t_ambient is ambient air temperature, and LHV is lower heating value. Target 85-92% efficiency for most industrial applications.
- Air/Fuel Ratio Adjustment: If combustion parameters are outside target ranges, adjust burner air damper or fuel supply. Record before/after readings and document all changes in the commissioning report.
Section 4: Post-Commissioning Optimization and Ongoing Maintenance Strategy
Performance Baseline Documentation
Create a detailed commissioning report documenting:
- All electrical test readings (control voltage, flame signal strength, ignition transformer output)
- Fuel supply parameters (gas pressure/oil temperature at startup and full load)
- Pressure switch calibration point and actual trip pressure
- Combustion analysis results (O₂, CO₂, CO, NOx if measured, flue gas temperature, efficiency)
- Burner response times (ignition delay, shutdown response, modulation transitions)
- Date, time, ambient temperature, and technician name
This baseline enables contractors to identify performance drift during subsequent maintenance visits.
Seasonal Adjustment and Load Testing
In Southeast Asia, seasonal temperature and humidity variations affect burner performance:
- Pre-Summer/Dry Season Adjustment (March-May): Reduce thermostat setpoint by 2-3°C and verify burner cycles appropriately. High ambient temperatures reduce required heating output.
- Monsoon Season Preparation (May-October in most SE Asia regions): Verify combustion air intake is protected from water ingress. Test pressure switch response with elevated humidity (humidity >80% affects some sensors).
- Load Profile Documentation: Record burner on/off cycles and modulation patterns over 2-week periods in different seasons. This data guides future maintenance intervals and identifies efficiency losses.
Establishing Preventive Maintenance Schedule
For HVAC contractors managing multiple installations, schedule maintenance based on actual operating hours:
- Quarterly Inspections (every 500 operating hours or 3 months): Visual burner inspection, fuel system check, control circuit testing, combustion analysis.
- Semi-Annual Service (every 1,500 operating hours or 6 months): Nozzle cleaning/replacement, fuel line filter replacement, flame detector cleaning, pressure switch calibration check.
- Annual Comprehensive Service (every 3,000+ operating hours): Complete burner disassembly, chamber inspection for fouling/scaling, ignition transformer testing, efficiency re-measurement, thermal imaging of heat exchanger.
Document all maintenance activities and track performance metrics (ignition delay, combustion efficiency, shutdown response) to identify trending issues before failures occur.
Troubleshooting Framework for Common Issues
No Ignition Despite Fuel Supply: Check ignition transformer voltage (should be 8-12 kV secondary), verify electrode gap (typically 2-4mm), and ensure spark plug not fouled. Common in humid environments: clean spark gap and check electrode ceramic for moisture damage.
Frequent Flame Failures: Usually indicates weak flame signal. Clean flame detector lens (UV detector: clear any discoloration; ionization probe: burnish electrode), verify flame color is bright blue (not orange/yellow indicating poor combustion), and confirm adequate combustion air.
High CO Emissions (>200 ppm): Suggests incomplete combustion. Check fuel nozzle for damage, verify air damper opening is adequate, and inspect combustion chamber for scaling. In humid climates, moisture in gas can impair combustion—install gas dryer if needed.
Burner Will Not Shut Down: Check thermostat continuity, verify flame detector is functioning (block flame and confirm immediate shutdown), and test pressure switch operation. Failed pressure switch often causes nuisance lockouts—replace immediately if trip point cannot be reset.
Poor Efficiency Despite Correct O₂ Levels: Indicates heat loss through fouled surfaces. Inspect and clean heat exchanger interior, check stack temperature (if excessive, suspect scale buildup), and verify burner mounting is secure (loose mounting allows flame to strike chamber walls, causing inefficient heat transfer).
Conclusion
Successful burner installation and commissioning requires attention to detail, systematic testing, and documentation. HVAC contractors who invest in proper commissioning procedures and maintain comprehensive performance baselines protect their customers' investments and build reputation for reliability.
3G Electric supplies the control components, burners, and diagnostic tools contractors need to execute professional installations across Southeast Asia. Our 35+ years of experience in industrial equipment distribution means we understand the regional challenges—tropical humidity, variable fuel quality, and demanding operating conditions—that impact burner system performance.
By following these installation and commissioning practices, contractors can confidently deliver efficient, safe, and long-lasting burner systems that perform reliably in Southeast Asian industrial environments.