Understanding Burners & Combustion Systems Before Installation
Burners & Combustion systems form the heart of industrial heating, steam generation, and process applications across Singapore's manufacturing and facilities sectors. As an HVAC contractor, your role extends beyond basic equipment placement—you're responsible for ensuring safe, efficient, code-compliant installations that perform reliably under tropical operating conditions.
With over 35 years of experience supplying industrial equipment across Southeast Asia, 3G Electric has guided hundreds of contractors through successful burner installations. The key to professional-grade results is understanding that every burner installation involves three critical phases: pre-installation preparation, mechanical commissioning, and control system calibration.
Unlike simple HVAC components, burners demand respect for combustion physics, safety regulations, and precise adjustment procedures. Singapore's adoption of international standards (EN 746-2, EN 676, and local guidelines) means your installation must meet exacting specifications. This guide provides the practical framework contractors need to execute installations safely and efficiently.
Phase 1: Pre-Installation Assessment and Safety Preparation
Site Evaluation and System Compatibility
Before touching any burner hardware, conduct a thorough site assessment:
- Fuel supply verification: Confirm gas line pressure (typically 17–20 mbar for commercial gas burners), delivery rate, and purity. Check that oil systems have proper storage, heating, and filtration. Measure actual pressures with a calibrated gauge—never assume supply specifications match nameplate ratings.
- Air supply pathway: Trace the complete combustion air path from intake through the burner air damper. Remove obstructions, ensure no recirculation of exhaust gases, and verify adequate fresh air availability. In tropical climates, moisture and salt spray corrosion affect air intake quality—inspect and clean intakes thoroughly.
- Clearances and ventilation: Confirm minimum clearances around the burner (typically 300–500 mm sides and rear for service access). Verify exhaust flue path is unobstructed, sloped correctly to prevent condensation pooling, and properly terminated according to local building codes.
- Electrical infrastructure: Verify 3-phase power availability, earthing/grounding compliance, and circuit capacity for burner motors and control systems. In Singapore's humidity, ensure proper IP-rated protection (IP40 minimum for burner areas).
Burner Selection Validation
Confirm the specified burner matches application requirements:
- Thermal power range (kW or Mcal/h) aligns with boiler or furnace nameplate ratings
- Fuel type(s) match available supply (gas-only, oil-only, or dual-fuel capability)
- Control modulation type (on-off, two-stage, or fully modulating) suits the application's turndown requirements
- Mounting flange, nozzle size, and combustion head geometry match the boiler/furnace manufacturer's specifications exactly
Do not substitute equivalent-appearing components without written approval from equipment manufacturers. Burner and boiler pairing is engineered as a system, and mismatches cause efficiency losses, safety failures, and warranty voidance.
Control Component Inventory and Testing
Before assembly, test all control components on the workbench:
- Burner control relay (such as Kromschroder Relay BCU 570WC1F1U0K1-E): Apply 230V AC power and confirm LED indicators respond correctly. Test manual reset button function.
- Pressure switch (such as Kromschroder Pressure switch DG 50U/6): With an external air pump, apply incrementally increasing pressure and verify switch closure occurs at rated setpoint ±5%. Document setpoint in your installation log.
- Flame detection module (such as Siemens Relay LFL 1.622 for gas or dual-fuel burners): In a darkened area, expose the UV or ionization sensor to flame simulation (UV lamp or calibrated ignition source) and confirm relay response within 2 seconds.
Any component failing bench tests must be replaced before site installation. This simple step prevents costly on-site troubleshooting and safety compliance failures.
Phase 2: Mechanical Installation and Assembly
Burner Mounting and Alignment
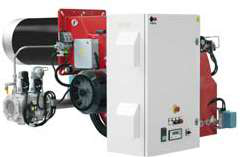
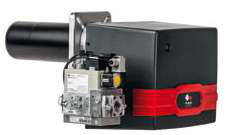
For FBR GAS XP 60/2 CE TC EVO and similar two-stage burners, or heavy-duty units like FBR KN 1300/M TL EL dual-fuel burners, precise mounting is essential:
1. Clean the boiler/furnace mounting flange and burner mounting face with a dry cloth—dust particles cause misalignment and gas seal failures.
2. Position the burner on the flange and hand-tighten all bolts in a star pattern (alternating bolts to distribute pressure evenly).
3. Using a straightedge or dial indicator, check that the burner air tube centerline aligns with the furnace/boiler combustion chamber. Misalignment of more than 2–3 mm causes uneven flame geometry and efficiency loss. Make small adjustment iterations if needed.
4. Torque all mounting bolts to the burner manufacturer's specification (typically 25–40 Nm for standard industrial burners). Over-tightening risks flange distortion; under-tightening allows gas leaks.
Fuel Line Connections
For gas burners:
- Use brass or stainless steel tubing rated for the pressure class (typically 4 or 6 bar for industrial gas systems).
- Slope gas lines gently downward (minimum 1:100 gradient) toward the burner to prevent air pockets in the line.
- Install a solenoid shut-off valve on the main gas line, positioned within 1 metre of the burner, with manual isolation ball valve downstream for maintenance access.
- Test all connections with soapy water at operating pressure—bubble formation indicates leaks. Tighten fittings and retest until no bubbles appear.
- Use high-pressure oil lines rated to at least 1.5× maximum system operating pressure.
- Route suction (intake) and return lines separately to avoid siphoning and cavitation.
- Fit a 100-micron oil filter on the suction line, positioned lower than the tank to ensure gravity-fed supply.
- Bleed air from the oil line before ignition by running the burner motor for 30 seconds with the gas valve closed, allowing oil to displace air from the system.
Air Damper Linkage Setup
For burners with modulating air control (two-stage or fully modulating):
1. With the burner at rest and control power off, move the burner air damper linkage through its full range—it should move smoothly without sticking.
2. Set the air damper to the low-fire position (minimum combustion air) and secure this position with a mechanical stop or adjustable screw. This ensures safe idle-state air supply.
3. Connect the damper linkage to the control relay or modulation unit according to the burner manual. Ensure linkage rods are straight, pivot pins are secured with cotter pins, and there is no mechanical binding throughout the full movement range.
4. Perform a manual damper cycle test with power applied: the damper should move from low-fire to high-fire position smoothly over 3–5 seconds. Note any hesitation or jerky movement, which indicates mechanical friction requiring correction.
Phase 3: Control System Calibration and Commissioning
Setting Pressure Switches and Safety Limits
Before firing the burner, calibrate all pressure switches to match the boiler/furnace design:
1. Fuel pressure switch (gas): Set to trigger burner ignition when gas supply pressure reaches 3–5 mbar above minimum safe operating pressure. This prevents startup on insufficient fuel supply.
2. Air pressure switch (combustion air damper control): Adjust setpoint so the burner transitions from low-fire to high-fire only when sufficient combustion air is available. For typical forced-draft burners, this is 15–25 mbar, depending on furnace design.
3. High-limit pressure switch (boiler): Set 5–10% above design pressure as a safety cutoff. At this pressure, the burner must shut off completely. Test by slowly increasing system pressure (using a hand pump on the test port) and confirming burner shutdown occurs at the setpoint.
Document all setpoints in your commissioning log with date, technician name, and measured values. These records are essential for future maintenance and regulatory compliance in Singapore.
Flame Detection and Ignition Sequence Testing
With the burner mounted but fuel supply isolated:
1. Apply 230V AC control power to the burner control relay.
2. Initiate a burner start command (manual switch, remote signal, or building control interface, depending on system type).
3. Observe the control relay LED sequence:
- Yellow LED (fan pre-purge phase): Should illuminate for 5–10 seconds while the air damper opens and blower motor runs. This purges unburned fuel from the combustion chamber.
- Red LED (ignition phase): Should illuminate as the ignitor (spark electrode or hot surface) energizes. Typically lasts 10–15 seconds while the control relay waits for flame confirmation.
- Green LED (flame detected): Should illuminate once the flame detection sensor confirms fuel ignition. If flame is not detected within the ignition timeout period, the relay should de-energize the fuel solenoid and lock out—requiring manual reset.
4. If the flame detection circuit is slow or unreliable (Green LED flickers or takes >2 seconds to confirm), the flame sensor requires cleaning or repositioning. Ensure the UV or ionization electrode has a clear, unobstructed view of the flame zone.
Combustion Analysis and Air-Fuel Ratio Tuning
Once the burner fires reliably, measure and adjust combustion efficiency:
1. Install a combustion analyzer (handheld flue gas analyzer) in the boiler's flue pipe, at least 1 metre downstream of the burner exit. Allow 10–15 minutes for flue gas temperature to stabilize.
2. Record flue gas composition:
- CO₂ (carbon dioxide): Target range 9–11% for natural gas, 11–13% for heavy oil. Higher CO₂ indicates efficient combustion; lower CO₂ suggests excess air.
- O₂ (oxygen): Target 3–5% for gas burners, 2–4% for oil burners. Excess O₂ (>6%) wastes energy; insufficient O₂ (<2%) risks incomplete combustion and CO formation.
- CO (carbon monoxide): Must be <100 ppm for safety and efficiency. CO >500 ppm indicates dangerous combustion conditions requiring immediate correction.
3. Adjust the air damper control: If O₂ is too high, slightly close the low-fire air damper setpoint by 1–2 mbar and retest. If O₂ is too low, open the air damper slightly. Make small iterative adjustments, waiting 2–3 minutes between changes for flue gas stabilization.
4. Record the final tuning parameters on your commissioning sheet, including CO₂, O₂, CO, and flue gas temperature. These baseline values are critical reference points for future maintenance and diagnostics.
Final Safety Interlocks and Performance Verification
Before handing over the installation to the customer:
1. Test emergency shutoff: Press the manual shutdown button or trigger a shutdown signal—the burner should extinguish within 2 seconds and fuel solenoid should close audibly.
2. Verify flame safeguard logic: After shutting down, wait 30 seconds, then attempt a restart. The burner should re-ignite normally, confirming the lock-out reset function works.
3. Load test: If the application has load control (boiler circulation, heating demand), operate the burner through at least two full modulation cycles (low-fire to high-fire and back) while monitoring flue gas composition. Combustion efficiency should remain stable across the load range.
4. Document all test results, final adjustments, and component serial numbers in a commissioning report. Provide the customer with copies of manufacturer datasheets, operation manuals, and your test log.
With 3G Electric's 35 years of experience supplying burner and combustion equipment across Singapore and Southeast Asia, we've seen countless successful installations follow this systematic approach. The discipline of pre-installation testing, careful mechanical assembly, and thorough commissioning testing prevents the safety failures, efficiency losses, and compliance issues that plague rushed installations.
Summary: Key Takeaways for Professional Burner Installation
Successful burner installation depends on three equally important phases: thorough pre-installation assessment and component testing, precise mechanical assembly and alignment, and systematic control system calibration with documented performance verification. Each phase prevents classes of problems—safety failures, efficiency losses, and control instability—that become expensive or dangerous to correct after the system is live.
By investing time in these procedures on every job, HVAC contractors build a reputation for reliability, meet Singapore's code compliance requirements, and deliver systems that perform efficiently throughout their operational life. Equipment from leading manufacturers like Kromschroder, Siemens, and FBR is designed to last decades when properly installed and maintained—your commissioning work sets the foundation for that long-term success.