Understanding Gas Valves & Regulation in Field Service
Gas valves and regulation systems are critical control points in industrial gas distribution, laboratory gas delivery, and process automation. For maintenance teams, the ability to diagnose valve performance in the field—without waiting for manufacturer testing—directly impacts uptime and safety compliance.
With over 35 years of experience supplying industrial equipment globally, 3G Electric has seen how quickly a suspected valve fault can cascade into production delays. The key difference between a responsive maintenance team and a reactive one is the confidence to perform rapid, accurate field diagnostics.
This guide focuses on practical testing methods, measurement approaches, and verification procedures that maintenance teams can execute on-site. You'll learn when a valve truly needs replacement versus when adjustment or cleaning resolves the issue.
Field Pressure Testing and Measurement Techniques
Establishing a Baseline Measurement Protocol
Before diagnosing any valve fault, establish what normal operation looks like for your specific system. Record three baseline data points:
- Inlet pressure at the valve entry point
- Outlet pressure after regulation
- Flow rate during normal operating conditions
Use a calibrated digital pressure gauge rated for the gas type and pressure range you're measuring. Analog gauges drift; digital gauges with certification provide defensible records. For safety-critical applications, always use gauges specifically approved for the gas medium (oxygen, nitrogen, natural gas, etc.).
Testing Pressure Drop Across a Valve
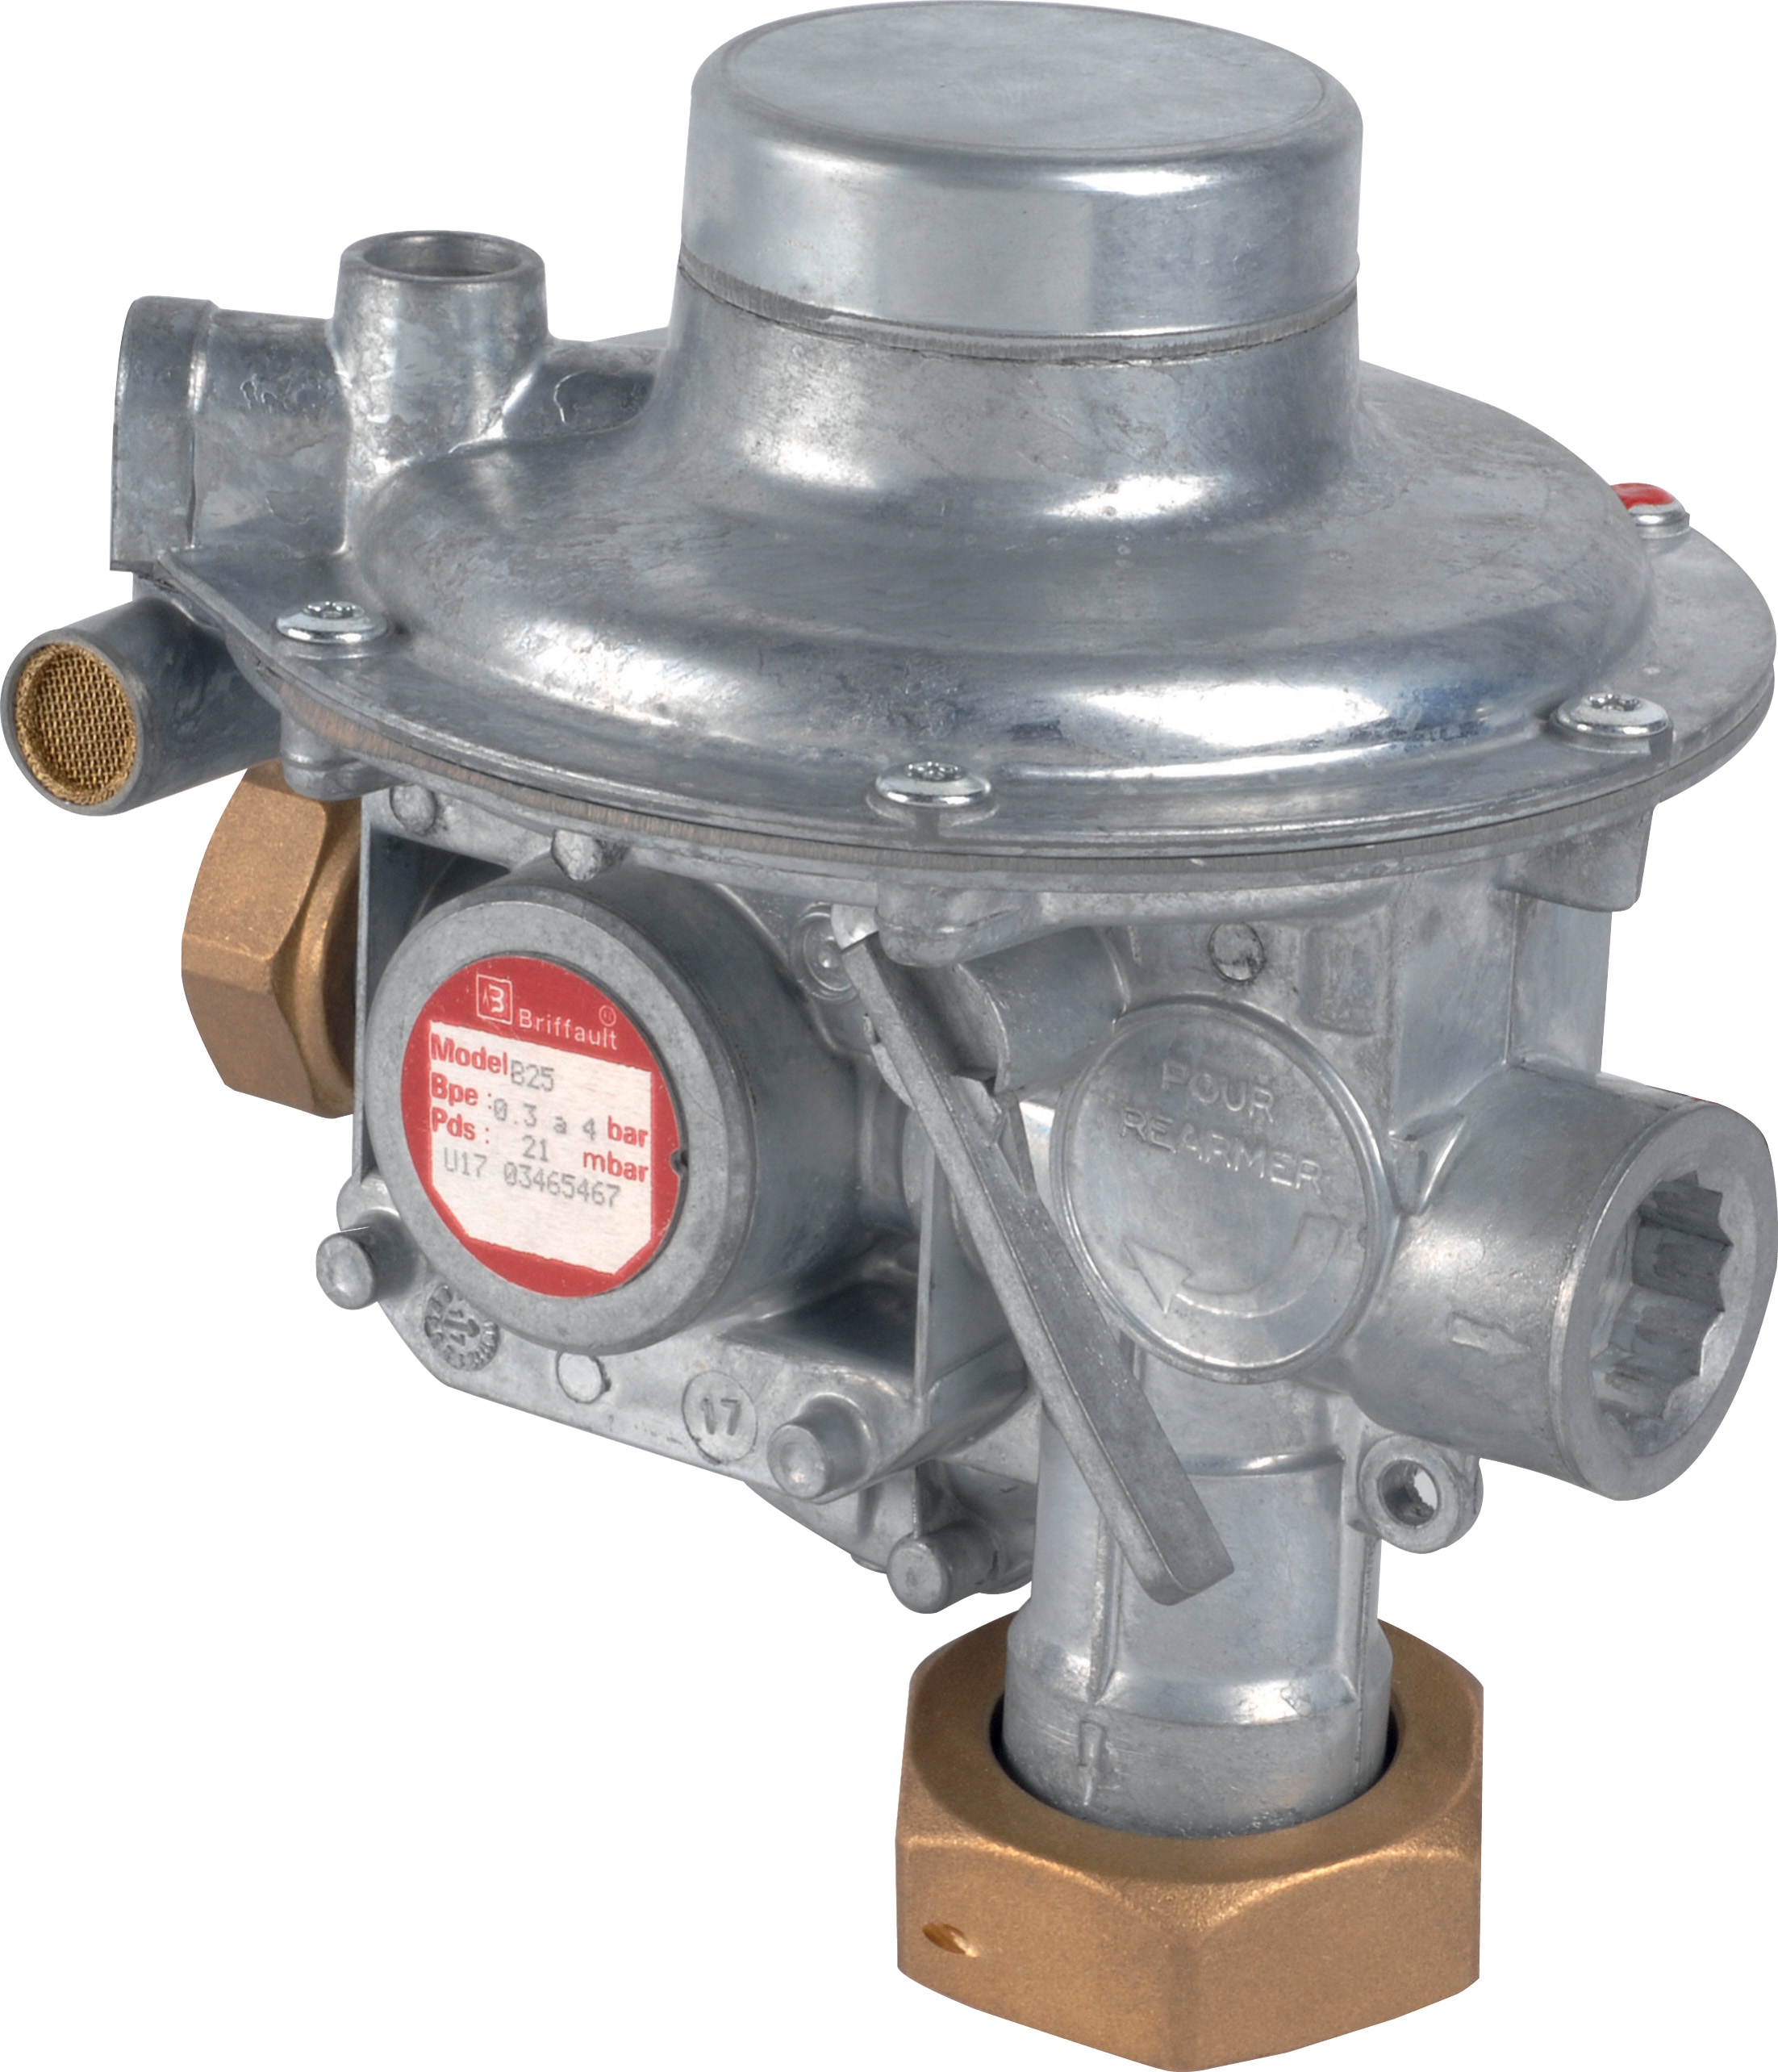
A typical pressure regulator like the Francel B25/37mb with integrated safety relief is designed to maintain a stable outlet pressure under varying inlet conditions. To verify this behavior:
1. Record inlet pressure with the valve under load (gas flowing through)
2. Record outlet pressure at the same moment
3. Repeat the measurement 10 minutes later to confirm stability
4. Increase inlet pressure incrementally (if the system allows) and confirm outlet pressure remains constant
If outlet pressure drifts more than ±5% from the nominal setting (in this example, 37 mbar), the regulator's internal seat or diaphragm is likely compromised. Document the drift pattern—gradual drift suggests wear; sudden spikes suggest debris or seat damage.
Measuring Response Time Under Load Change
Regulators must respond quickly when downstream demand changes. Perform this test during a controlled maintenance window:
1. Operate the system at 50% normal flow
2. Record outlet pressure (should be stable)
3. Suddenly increase flow demand to 100% (by opening a downstream valve or manual test port)
4. Observe outlet pressure for the next 5 seconds
Output pressure should stabilize within 2–3 seconds. If it takes longer, or if it overshoots then undershoots, the regulator's internal balance mechanism is sluggish. This often indicates:
- Contamination in the regulator body
- Worn or sticking piston/diaphragm.
- Incorrect spring tension.
Testing Safety Relief Function
Safety relief valves must vent excess pressure if inlet pressure exceeds the setting. Field testing requires extreme caution and should only be performed by trained personnel:
1. Install a pressure gauge downstream of the relief valve
2. Slowly increase inlet pressure using a controlled source (never by isolation/blockage)
3. Note the pressure at which gas begins to vent (audible or visible discharge)
4. Document this cracking pressure
5. Return inlet pressure to normal immediately
If relief does not crack within ±10% of the marked setting, the relief poppet is stuck or the seat is damaged. Do not operate the valve further; replace it to maintain safety compliance.
Functional Verification and Component-Level Testing
Testing Solenoid Valve Response
Electric solenoid valves, such as those used alongside regulators in automated gas systems, must respond predictably. Functional testing involves:
Electrical continuity check:
- Disconnect the solenoid coil from the supply
- Use a multimeter on the ohms setting
- Measure resistance across the coil terminals
- Compare to the rated coil resistance (typically 20–50 ohms for 24V DC solenoids)
- If resistance is infinite (open circuit), the coil is burnt out
- If resistance is near zero, the coil has an internal short
- Re-connect power and listen for an audible click at the solenoid
- With gas flowing, briefly de-energize the solenoid and confirm flow stops
- Re-energize and confirm flow resumes
- Repeat 5 times to verify consistency
- If the valve responds inconsistently, sticky poppet or contamination is likely
Testing End-of-Stroke Contacts
Valves like the Elektrogas VMM 20-25 end-of-stroke contact valve (6 bar) are used to signal actuator position. Testing involves:
1. Mechanical position test: Move the valve stem fully in one direction using a 3 mm Allen wrench. Check that the electrical contact closes (use a multimeter continuity check).
2. Reverse the position: Verify the contact opens when the stem returns.
3. Repeat 20 times to confirm no chatter or missed contacts.
4. Under pressure: Perform steps 1–2 again with gas flowing at the rated pressure (6 bar). The contact closure should remain reliable.
If the contact behaves inconsistently under pressure, internal spring fatigue or contact erosion is occurring. Schedule replacement.
Checking Regulator Adjustment Mechanisms
Most regulators include an adjustment screw (sometimes protected by a lock nut or sealed cap). To safely adjust:
1. Document the current setting: Count full rotations and quarter-turns as you back out the adjustment screw until it stops (do not force).
2. Close the adjustment screw gently until resistance is felt (do not over-tighten).
3. Re-establish baseline pressure with the original inlet/outlet conditions.
4. Turn the screw 1/4 turn at a time, waiting 30 seconds after each turn for outlet pressure to stabilize.
5. Stop when outlet pressure matches the required setpoint.
6. Lock the adjustment using the lock nut (if fitted) and reseal any protective caps.
If the screw reaches maximum rotation without changing outlet pressure, internal corrosion or poppet adhesion is likely. Disassembly and cleaning may restore function, but replacement is often safer.
Interpreting Common Fault Patterns and Root-Cause Analysis
Outlet Pressure Too High
Likely causes:
- Adjustment screw turned too far (clockwise on most regulators)
- Debris on the poppet seat, preventing full closure
- Internal spring weakened (rare; usually due to corrosion)
- Back off the adjustment screw 1/4 turn and re-test; if pressure drops, the screw setting was incorrect
- If pressure remains high, close the downstream isolation valve completely and observe: pressure should rise no further (confirms regulator is trying to limit flow); if it rises continuously, replace the regulator
Outlet Pressure Too Low or Unstable
Likely causes:
- Inlet pressure has dropped (check upstream source and isolation valves)
- Downstream blockage or excessive demand (confirm with downstream isolation test)
- Internal diaphragm or piston fractured
- Contamination in the regulator body
- Isolate the regulator: close inlet and outlet isolation valves; open a test port upstream of the regulator and confirm inlet pressure is correct
- If inlet pressure is normal, isolate the regulator outlet and observe: does outlet pressure stabilize at a higher level? (indicates downstream demand is pulling pressure down)
- If inlet pressure is normal and outlet isolation shows no improvement, the regulator's internal mechanism is compromised; replace it
Hissing or Continuous Venting
Likely causes:
- Safety relief poppet is stuck open
- Outlet pressure exceeds relief setting due to downstream isolation
- Main poppet is leaking (minor venting is normal during adjustment, but continuous flow is not)
- With the regulator under load, locate the relief vent outlet (usually a small port or tube)
- If gas is flowing from the relief continuously, immediately isolate the inlet (close the upstream isolation valve)
- Once safe, listen to the vent location with the inlet isolated: if gas is still flowing, the main poppet seat is damaged; replace the regulator
- If venting stops, the relief was overpressured; investigate why downstream pressure exceeded the relief setpoint
Slow Response or Hunting (Pressure Oscillation)
Likely causes:
- Regulator response spring is weak or damaged
- Outlet line volume is too large for the regulator size (typically seen in lab distribution systems)
- Damping orifice is blocked
- Perform the load-change response test (described earlier); if response time exceeds 5 seconds, the spring may be weak
- If response is fast initially but then the pressure hunts (oscillates by ±2–5 mbar), the outlet volume is too large; this is a system design issue, not a valve fault
- Consult the regulator datasheet for maximum recommended outlet volume; if your system exceeds it, add a larger regulator or buffer tank
Maintenance Team Workflows and Record-Keeping
Creating a Gas Valve Test Log
Maintenance accountability and compliance requires documentation. Implement a simple log for each gas system:
Monthly Test Card (example):
| Date | Inlet Pressure (bar) | Outlet Pressure (mbar) | Flow Rate | Response Time (sec) | Notes | Technician | Next Action |
|------|----------------------|------------------------|-----------|---------------------|-------|-----------|-------------|
| 2024-01-15 | 2.5 | 37.2 | Normal | 2.5 | Stable | J. Smith | Continue |
| 2024-02-15 | 2.5 | 38.1 | Normal | 3.2 | Minor drift | J. Smith | Monitor |
| 2024-03-15 | 2.5 | 39.5 | Reduced | 4.1 | Drift increasing | J. Smith | Replace |
This simple approach helps you detect degradation trends before failures occur.
Planning Preventive Maintenance Around Test Results
Use field test data to schedule replacements before failures:
- Pressure drift of 5% per month: Plan replacement within 2 months
- Response time increasing: Plan replacement within 1 month (system may fail under peak demand)
- Any sign of relief venting: Plan replacement within 1 week
- Solenoid coil resistance drifting: Plan replacement within 2 weeks
Supply Chain Integration with 3G Electric
When field diagnostics confirm a valve needs replacement, fast sourcing is critical. 3G Electric stocks a global range of gas valves and regulators, including the Francel B25/37mb pressure regulator and the Elektrogas VMM 20-25 end-of-stroke valve. With over 35 years of distributor relationships, we can typically expedite delivery within 24–48 hours for common industrial sizes.
Maintenance teams should maintain a spare parts inventory for critical valves. Common practice is to stock:
- One replacement regulator per system (kept sealed until needed)
- Two replacement solenoid coils per automated system
- One replacement safety relief valve per critical circuit
Sparingly stocked spares often pay for themselves on the first emergency repair.
Summary: From Diagnostics to Confidence
Gas valve diagnostics in the field is a learned skill. The procedures in this guide—pressure measurement, response testing, component verification, and fault interpretation—are all within the capability of a trained maintenance technician using standard tools (pressure gauges, multimeters, and hand tools).
The goal is not to become a valve designer, but to confidently answer three critical questions:
1. Is this valve within specification? (Use pressure and response time tests)
2. Can this valve be safely adjusted or cleaned, or does it need replacement? (Use fault pattern analysis)
3. When should I order a replacement? (Use trend analysis from your test log)
By implementing systematic field testing, maintenance teams can reduce unplanned downtime, avoid emergency sourcing costs, and maintain the safety compliance that industrial gas systems demand. Start with one system, build your baseline, test monthly, and log results. Within three months, you'll have the confidence—and the data—to manage your gas valve fleet proactively rather than reactively.
